|
1. Create a new worksheet
All worksheets are created from the Template123 worksheet.
|
|
Step
|
Task
|
Screenshot
|
|
1.1
|
Click on create ‘New Sheet’ button on the Pricing Modifiers Wizard ribbon.
|
|
|
1.2
|
A new worksheet will be created and the message shown will appear.
Click ‘OK’
|
|
|
2. Download a Pricing Modifier, and associated Lines and Attributes
We will now download into the worksheet one of your existing Pricing Modifiers.
|
|
Step
|
Task
|
Screenshot
|
|
2.1
|
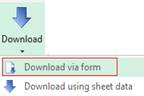
Put cursor on any blank row below row 9.
Click on the ‘Download’ icon and select ‘Download via form’ on the Pricing Modifiers Wizard ribbon.
|
|
|
2.2
|
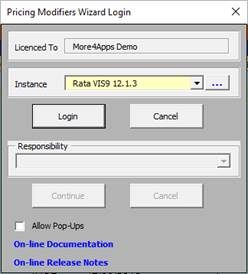
The following screen may appear when the above action is undertaken. This indicates that you are not logged into your Oracle Instance.
Select the correct Oracle Instance from the drop down list provided, click on the login button and enter your user name and password.
Select a Responsibility and click ‘Continue’.
|
|
|
2.3
|
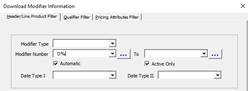
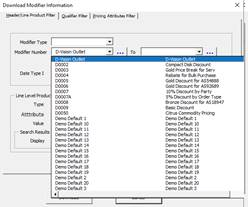
The ‘Download Modifier Information’ form will display.
|
|
|
2.4
|
Either enter:
1. An existing Pricing Modifier in the field provided.
2. A portion of the Pricing Modifier and place the wild card % at the end and or beginning of the characters.
• Select the  icon icon
• Select the  icon icon
• Select from the list of values
3. A portion of the Pricing Modifier and place the wild card % at the end and or beginning of the characters. This will download all Pricing Modifiers which contain the characters entered.
4. A Pricing Modifier in the first field using options 1 or 2 above and also enter a value in the ‘To’ field. This will download all Pricing Modifiers which are between (and included) in this range.
Select the ‘Download’ button.
|
|
|
2.5
|
You will now have either one or multiple Pricing Modifiers in your worksheet.
|
|
|
3. Create a new Pricing Modifier from the downloaded record
We will now use the downloaded Pricing Modifier as a template for a new Pricing Modifier.
|
|
Step
|
Task
|
Screenshot
|
|
3.1
|
For this exercise (using Excel functionality) delete all Pricing Modifiers except for one which has Pricing Modifier Lines.
|
|
|
3.2
|
Place your cursor on a row which holds the Pricing Modifier.
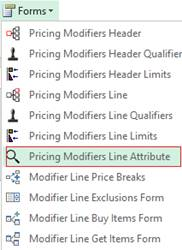
Click on the ‘Forms’ icon and select ‘Pricing Modifiers Header’ on the Pricing Modifiers Wizard ribbon.
Alternatively double-click on the row which holds the Pricing Modifier in the Header section.
|
|
|
3.3
|
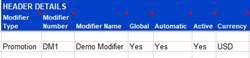
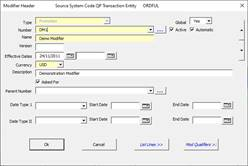
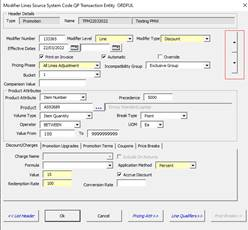
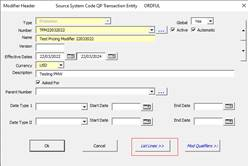
The ‘Modifier Header’ will display.
|
|
|
3.4
|
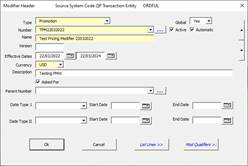
Make the following changes:
1. Enter the Number of TPM and today’s date (TPM12052020).
2. Rename the Pricing Modifier Name to Test Pricing Modifier plus today’s date (Test Pricing Modifier 12052020).
3. Change/Enter the first Effective Date to today’s date.
4. Change/Enter the second Effective Date to today’s date plus 2 years.
5. Enter a Description in the field provided with any value.
Click the ‘List Lines>>’ button.
This button will save the changes you have made to the Header and take you to the first line of your Pricing Modifier.
Note - This function is on all of the forms and allows you to move between the Header, Line, Attribute and Qualifier forms easily.
|
|
|
3.5
|
The ‘Modifier Lines’ form will display.
You can move between lines of the Pricing Modifier by using the arrows on the right hand side of the form (as indicated by the screenshot).
Note - If you have multiple Pricing Modifiers on your worksheet the line form will move between all Pricing Modifiers.
Make the following changes to each of the lines:
• Change the first Effective date to today’s date.
• Make the second Effective date blank if already populated.
Click the Ok button.
The form will close and the changes will be written to your worksheet.
Note - The Pricing Modifier Lines Form has a ‘Pricing Attr>>’ button which will navigate you to the Line Attribute form which will display the data currently held in the worksheet. For this exercise we will not change these attributes.
|
|
|
3.6
|
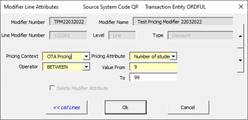
Click the ‘Forms’ icon and select ‘Pricing Modifiers Line Attribute’.
This will open the ‘Modifier Line Attributes’ form.
Create or change the attribute values, as per the example.
Click Ok to write the changes to your worksheet.
|
|
|
3.7
|
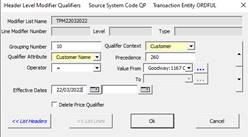
Create Header Qualifier
Place your cursor anywhere on the Pricing Modifier record and click the ‘Forms’ icon and select ‘Pricing Modifiers Header Qualifier’ on the Pricing Modifiers Wizard ribbon.
The ‘Header Level Modifier Qualifiers’ form will display.
Complete the details as appropriate for your instance of Oracle and select Ok which will save the changes to your worksheet.
If there are any other Header Pricing Qualifiers on the sheet, change the ‘Header Qualifier Start Date’ to Today’s date.
Remove any ‘Header Qualifier ID’ values in the Header Pricing Qualifiers section.
|
|
|
3.8
|
Create Line Qualifier
Place your cursor anywhere on the Pricing Modifier record and click the ‘Forms’ icon and select ‘Pricing Modifiers Line Qualifiers’ on the Pricing Modifiers Wizard ribbon.
The ‘Line Level Modifier Qualifier’ form will display.
Complete the details as appropriate for your instance of Oracle and click ‘Ok’ which will save the changes to your worksheet.
|
|
|
4. Upload the Pricing Modifier into Oracle
We will now upload this record into Oracle to create a new Pricing Modifier which will have the same line and attribute details except for those changed during the exercise.
|
|
Step
|
Task
|
Screenshot
|
|
4.1
|
Place your cursor on any row which has the Pricing Modifier.
Select the ‘Validate Option’ of Validate Only from the Pricing Modifiers Wizard ribbon.
|
|
|
4.2
|
Select the ‘Load Option’ of Create/Update from the Pricing Modifiers Wizard ribbon.
|
|
|
4.3
|
Click the Upload icon and select Upload Selected on the Pricing Modifiers Wizard ribbon.
|
|
|
4.4
|
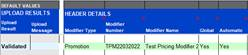
Your Pricing Modifier will show an ‘Upload Result’ of Validated.
Once the data has been corrected revalidate the Pricing Modifier by placing your cursor on any row with the Pricing Modifier and completing step 4.3. You can do this as many times as appropriate until all lines have a validated upload result.
|
|
|
4.5
|
Once you have resolved any issues (if any) place your cursor on any row which has the Pricing Modifier.
Select the Validate Commit option from the Pricing Modifiers Wizard ribbon.
|
|
|
4.6
|
Click the ‘Upload’ icon and select ‘Upload Selected’ on the Pricing Modifiers Wizard ribbon.
|
|
|
4.7
|
This will load the Header, Header Qualifier, Modifier Lines and Pricing Attribute sections.
|
|
|
4.8
|
Log into your instance of Oracle and check the Pricing Modifier has been loaded successfully.
|
|
|
5. Make changes to an existing Pricing Modifier
We will now download the Pricing Modifier created above and make some changes.
|
|
Step
|
Task
|
Screenshot
|
|
5.1
|
Click on any row below the modifier created above.
Click the ‘Download’ icon and select ‘Download via form’ on the Pricing Modifiers Wizard ribbon.
|
|
|
5.2
|
On the ‘Download Pricing Modifier information’ form, enter the name of the Pricing Modifier created at 3.4, and then select the search icon 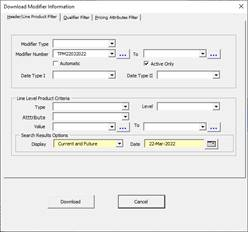
Select the ‘Download’ button.
|
|
|
5.3
|
The Pricing Modifier will now be in your worksheet.
|
|
|
5.4
|
Place your cursor on a line populated by the Pricing Modifier downloaded and double click to open the Modifier Header form.
Click the List Lines>> button to move to the ‘Modifiers Line’ form.
|
|
|
5.5
|
For the first line enter the second effective date to be next month using the calendar icon to select a date.
This will end date this line as at the date entered.
Select ‘OK’.
The change will be written into your worksheet.
|
|
|
5.6
|
Scroll across to the ‘Modifier List Lines’ section of your worksheet.
Using the function of Excel copy the first line and paste this into an empty line for this modifier.
For the new line:
• Delete the Line Modifier Number.
• Change the Line Start date to be 1 day after the Line End date.
• Remove the Line End Date.
• Change the value based on the application method.
|
Copy Existing Line
Change Line Start and End Date, remove Modifier Number
Change Value
|
|
5.7
|
In this example the line copied had Line Price Qualifiers. If your price modifier has qualifiers you will need to end date the qualifier for the first line and remove the qualifiers for the new line.
Scroll to the Line Pricing Qualifiers section of the worksheet and manually enter an end date for the line which is being end dated and delete the qualifier for the new line.
|
Before
After
|
|
6.Upload the changes into Oracle
We will now upload the changes to the existing line and the new line into Oracle.
|
|
Step
|
Task
|
Screenshot
|
|
6.1
|
Place your cursor on any row which has the Pricing Modifier.
On the Pricing Modifiers Wizard ribbon select the Validate Commit option, and the Create/Update option.
Click the Upload icon and select Upload Selected.
|
|
|
6.2
|
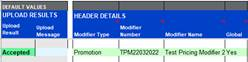
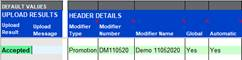
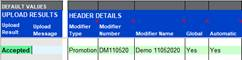
Your Pricing Modifier will show an ‘Upload Result’ of Accepted.
|
|
|
6.3
|
Log into your instance of Oracle and check that the changes have flowed through.
|
|
|
|