The Wizard’s primary mode is ‘Items’. This mode can be used to create and update both master and organization level items using the Oracle Interface tables, create revisions and assign categories/catalogs to items.
Once the sheet has been created, open the Items form by positioning your cursor on the row you wish to contain the Item data (below row 10 ‘Default Values’). Then either double-click in one of the cells in the worksheet or click on the ‘Forms’ icon on the ribbon to open the form to enter data.
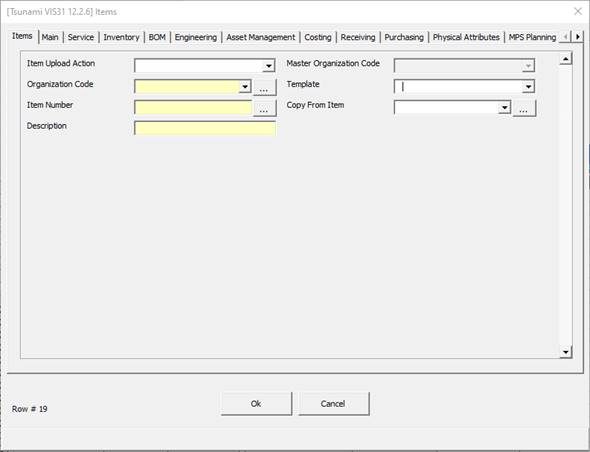
Items Form
This form is used to enter information into the worksheet and validate the information.
The fields displayed are the columns that were on the active sheet when the Wizard was initialized. You can enter data directly into the form and use the list of values supplied.
Click on the tabs at the top of the form to navigate between sections.
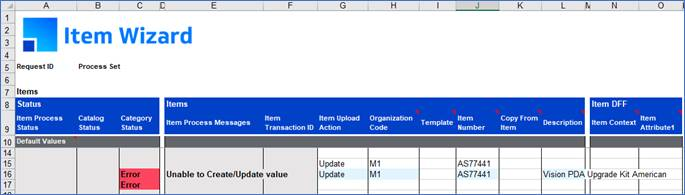
• ‘Item Upload Action’ field - Determines if you are creating or updating an item. For more information on this refer to the Upload Columns - Create Vs Update section.
• Yellow fields are mandatory.
• White fields are optional.
• Fields will be highlighted in Red if they contain an invalid value.
• Use the List of Values to pick a value or simply type directly into the field.
• Click on the OK button and the information will be written to the worksheet.
• Click on the Cancel button and the information will not be written to the worksheet.
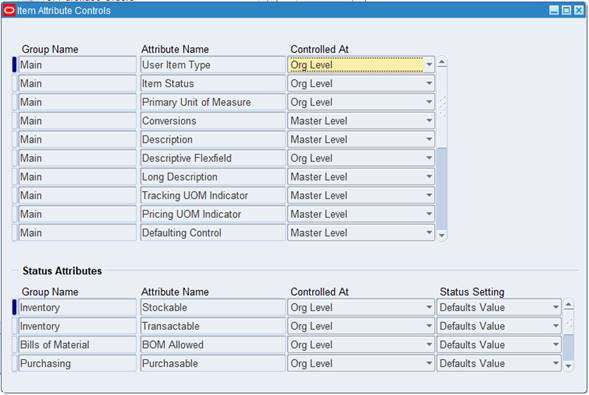
Display Attributes
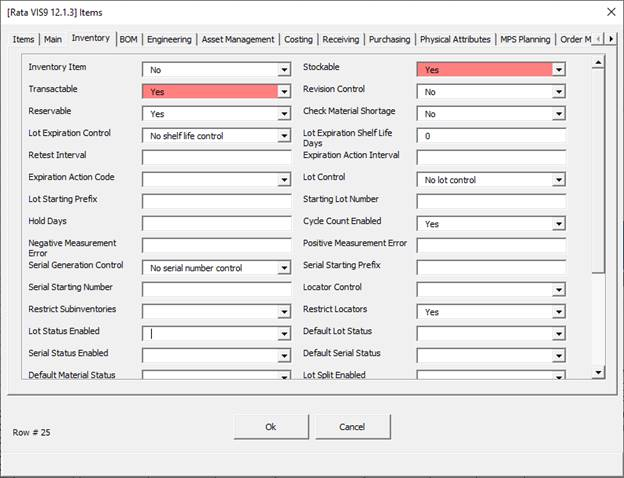
Item attributes can be controlled at either the master or organization level. This is set up in Oracle EBS in the following form:
In the Wizard if a field that has Master Level control is modified at the Organization level, the Wizard will error the field as shown:
This validation is also applicable in the user forms when modifying values.
Template is a defined set of attribute values. When you apply a template to an item, you overlay or default in the set of attribute values to the item definition. While updating the item with a different template, remove other sections and leave the Items section with the following columns: Item Process Message, Item Transaction ID, Item Upload Action, Organization Code, Template, Item Number, Copy From Item and Description.
Generate Item Number
The Item Wizard Custom Package enables customized Item Number generation. To use this functionality, you need to set out your data as per the following:
You need to set “More4Apps: IW Enable Item Number Generation” profile in oracle to ‘Yes’.
This data layout is the bare minimum. You can enter as many fields as you wish, all we require is the Item upload Action be set to ‘Create’, an organization and description is provided, and the Item field is left blank.
In the custom package you will have entered your own PL/SQL to generate your item numbers based on any varying combinations, sequences or SQL.
Next, upload the data as per the standard upload process. Once validation and load have completed you will notice the Item Number field has been generated and populated in the sheet.
Next submit the concurrent program and refresh the sheet. The status will then change to Accepted, as long as no errors have occurred.
Refer to the Custom Package section of this document for instructions on how to initiate this feature.
Copy Functionality
Items can be created by copying the details from an existing item.
Copy functionality includes:
Copy From Item - Item attributes information is copied from the ‘Copy From Item’
to the new item you are defining.
Copy Categories - Item Categories information is copied from ‘Copy From Item’ to the new item you are defining when the ‘Copy Categories’ is “Yes”.
Copy Catalogs - Item Catalogs information is copied from ‘Copy From Item’ to
the new item you are defining when the ‘Copy Catalogs’ is “Yes”.
Descriptive Flexfields
To locate the ‘Item DFF’ form or ‘Global Item DFF’ sections of the user form, go to the end of the user forms list of tabs. At the far right the Item DFF or Global DFF tabs can be located. This is assuming the sections are on the sheet.
The fields will be displayed according to your Flexfield definition.
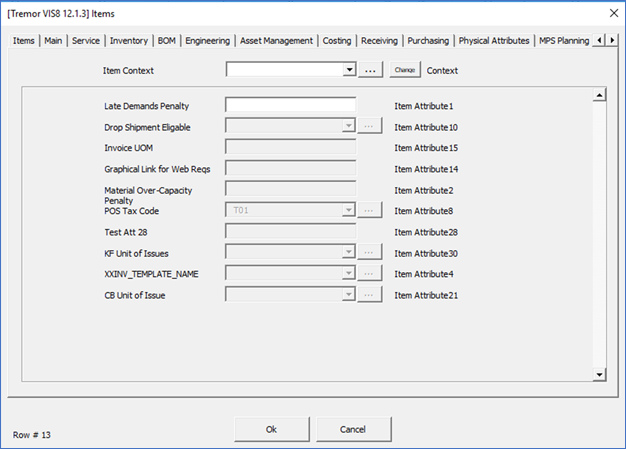
Items DFF form:
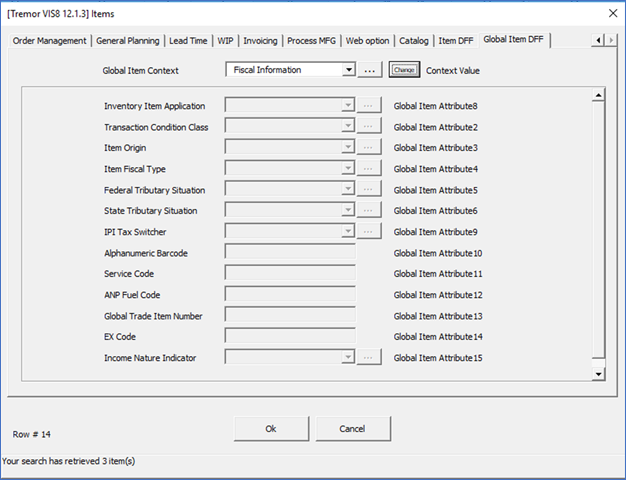
Global Item DFF form:
Depending on your set up in Oracle, you may need to select a ‘Context’ from the LOVs and then click ‘Change’ (before the individual segments will display).
Even if you are not using the Context field, include it for all loads otherwise the DFF may not load ie if the Context column is missing from the sheet any values entered in the associated Attribute fields will be ignored and not uploaded to the interface. The column must exist even if it has no data.
Ensure to also include the columns on the sheet that pertain to the attributes set up in Oracle. For example, if you have DFFs set up for Attributes 1,4 and 6 then ensure columns Item Attribute1, Item Attribute4 and Item Attribute6 are on the sheet. If they are not on the sheet then they will appear ‘greyed out’ on the user forms.
Enter the information by typing into the fields or selecting from the lists of values.
Select Ok to return to the Master Item form.
Select Cancel to return to the Master Item form and cancel your changes.
This functionality is common to all of our tools.
Key Flexfields
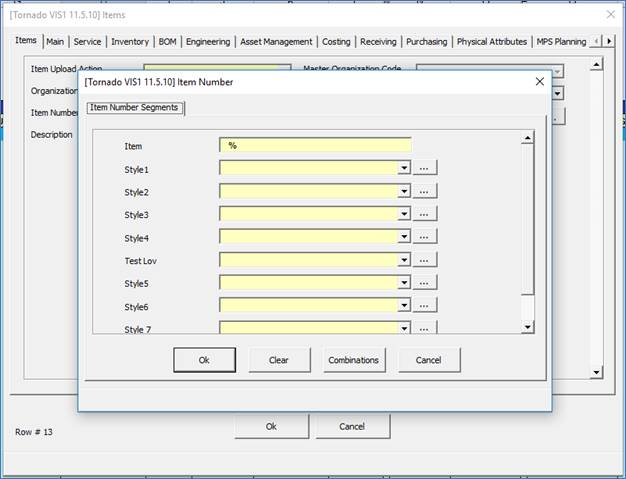
Fields containing Key Flexfields have the KFF icon  next to the field.
Example:
There are two instances of KFFs in Item Wizard. Fields that are searchable and are not essentially creating a new value will appear as a dropdown list of values.
These will appear as follows:
When creating new values using a KFF the following will appear:
Click on the icon and a form will open enabling you to pick the value of each segment. Enter the information by typing into the fields or selecting from the lists of values.
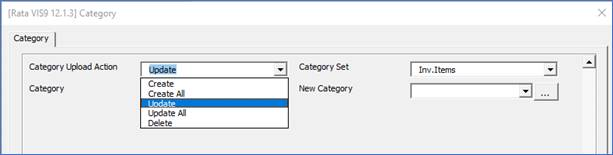
Category Form
Modifying Existing Categories
When modifying an existing category, the ‘Category Upload Action’ and ‘Item Upload Action’ need to be set to ‘Update’ or ‘Update All’.
With the existing value in the ‘Category’ field the new value must then be entered into the ‘New Category’ field either by entering the value directly into the worksheet or by opening the form and selecting from the list of values provided.
Notes:
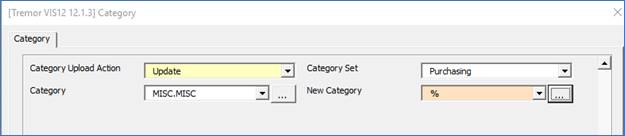
1. The ‘New Category’ column must be in your worksheet for it to appear on the form as illustrated below.
2. The existing ‘Category’ value must exist unchanged in the ‘Category column as it is part of the unique ID for the record.
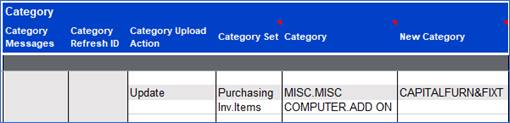
Once the form is closed then the values will be written to your worksheet.
After uploading and running the concurrent program the Category will be updated in Oracle along with any other changes you have made to other columns.
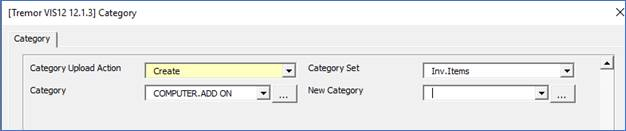
Create a Category for an existing Item
If you are adding a Category to an existing item, then the ‘Category Upload Action’ must be ‘Create’ or ‘Create All’ as the Oracle interface expects this. Also, the ‘Item Upload Action’ must be set to ‘Update’ or ‘Update All’ in this scenario.
After downloading the existing Item, open the form.
Note - The ‘New Category’ column is only used to Update an existing category. If any data is entered in the ‘New Category’ column this will be ignored by the interface when uploading into Oracle.
On the Category form select the appropriate upload action then specify the set/category.
Select ‘Ok’ on the form to write the data into your worksheet.
The Wizard requires the ‘Organization Code’ and ‘Item Number’ on your worksheet but the other item details are not required.
Delete a Category for an Existing Item
If you are deleting a Category for an existing item, then the ‘Category Upload Action’ must be ‘Delete’. Also, the ‘Item Upload Action’ must be set to ‘Update’ or ‘Update All’.
Note – Cannot delete default categories.
Catalog
A ‘Catalog’ can only be set up against a master item and only one catalog can exist for that master item.
Ensure that a catalog has been selected from the main item section of the Wizard before choosing your catalog elements.
If you are modifying an existing Catalog the ‘Catalog Upload Action’ must be ‘Update’ or ‘Update All’.
Select the Catalog Element from the list of values provided.
Once the form is closed then the values will be written to your worksheet. You can alternatively enter the details directly into the worksheet.
After uploading and running the concurrent program the Catalog will be updated in Oracle along with any other changes you have made to the item.
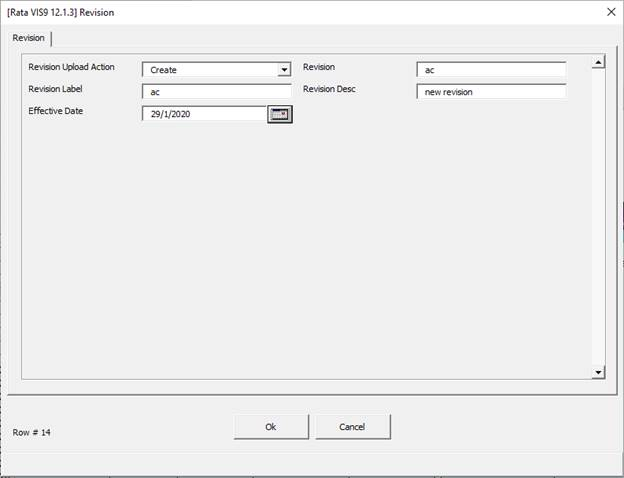
Revision Form
When an item is created, a revision record is automatically created by Oracle. An existing revision can be modified by adding a description or changing the revision date if it has not become effective yet.
To manage revisions the following columns are required at a minimum:
• Item Upload Action
• Organization Code
• Item Number
• Description
• Revision Upload Action
• Revision
• Revision Label
• Effective Date
Please note that all status and message columns for the Item and revision sections are also required. This can be set up simply using templating. For information on this please see the Manage Templates section.
Create a New Revision
If you are adding a new revision to an existing item then the ‘Revision Upload Action’ must be ‘Create’ as the Oracle interface expects this. You don’t have to put any action in the ‘Item Upload Action’.
After downloading the existing item, open the ‘Revision’ form.
For the ‘Revision Upload Action’ select ‘Create’ and enter your new revision and the date accordingly.
Revision Numbers (as per the Oracle user guide) – “Enter an alphanumeric revision for the item. You can use letters, numbers, and characters (such as *, &, and #) to label revisions. Letters are always in upper case and numbers may include decimals. To ensure that revisions sort properly, decimals should always be followed by a number. Valid revisions can include: A, B, 01, 02, A1, B1, 1A, 1B, 0.0, 0.1, A.0, A.1, and so on. Revisions are sorted according to ASCII rules. Each revision must be greater than the previous revision. Therefore, you cannot use revision 10 after revision 9 because, according to ASCII sorting, 10 precedes 9.
The value you entered in the Starting Revision field in the Organization Parameters window displays as the starting revision for the item.
For revisions that have the same Effective Date, the revisions sort in descending order starting with the last revision you entered."
Select ‘Ok’ on the form to write the data into your worksheet.
In ‘Create’ mode you will not be able to update any of the item details; subsequently if the item data needs correction, then you should undertake a separate upload for this purpose.
The Wizard requires the ‘Organization Code’ and ‘Item Number’ on your worksheet but the other item details are not required.
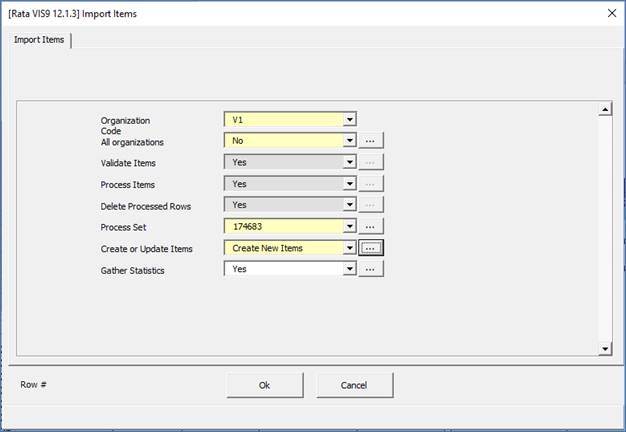
Upload the record. When submit the concurrent program select ‘Create New Items’ in the Create or Update Items parameter.
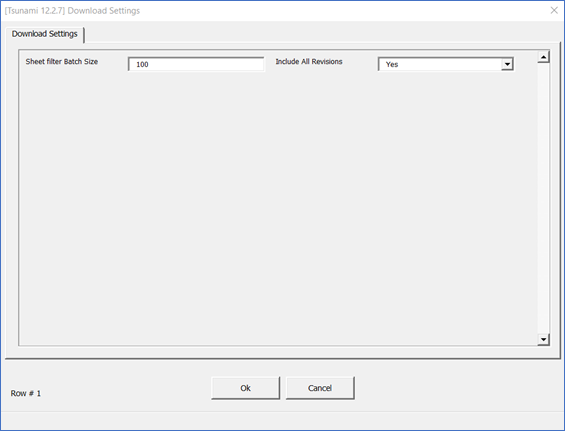
Download All the Revisions Via ‘Download using sheet data’
When you download an item via ‘Download using sheet data’, the item and its current revision will be downloaded. To Download all the Revisions, you have to use the ‘Download Settings’ form. Note – The ‘Revisions’ section needs to be on the worksheet for ‘Include All Revisions’ field to be accessible on the form.
In the Download Settings form, select ‘Yes’ in the ‘Include All Revisions’ field. This will download all the Revisions via sheet.
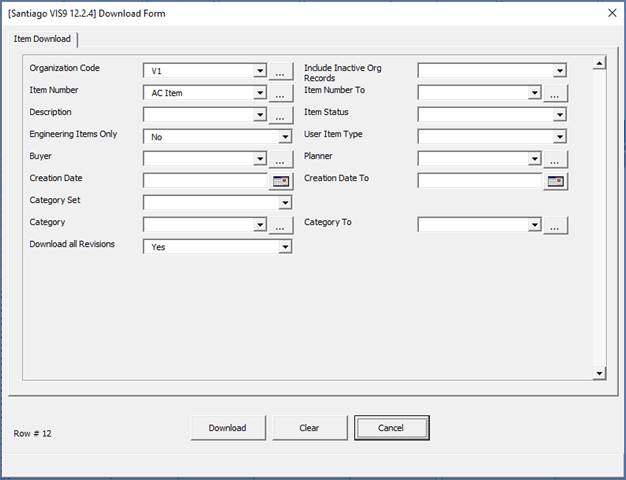
Download All the Revisions Via ‘Download Form’
To download all the revisions, you have to use the ‘Download Form’.
On the Download Form, select ‘Yes’ in the ‘Download all Revisions’ field. This will download all the Revisions (as long as the Revisions section is included on the worksheet).
Refer to section: