Update Requisitions
Requisition Wizard provides an ‘Update Requisition’ Template which enables you to modify existing Requisition Headers, Lines and Distributions.
The PO_REQUISITION_UPDATE_PUB procedure provides the ability to update requisitions directly through an Oracle public API.
Note: This functionality requires the application of patch 17261133:R12.PO.B for 12.1.x and patch 18404721:R12.PO.D for 12.2.x.
Additional patches for Oracle bug fixes:
12.1 Patch 31044570
12.1.3 Patch 326250521:R12.PO.B
12.2 Patch 28716371
The following data can be updated using the ‘Update Requisition’ Template:
|
Header
|
Lines
|
Distributions
|
|
Req Description
|
Item Description
|
Dist Quantity
|
|
Req Note to Approver
|
Unit of Measure
|
Dist Amount
|
|
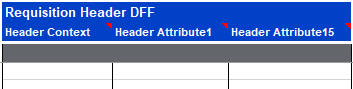
Requisition Header DFFs
|
Line Quantity
|
DistGL Date
|
|
|
Line Amount
|
Charge Account *
|
|
|
Need-by Date
|
Accrual Account
|
|
|
Reference Number
|
Variance Account
|
|
|
Destination Organization
|
Project Number
|
|
|
Location
|
Task Number
|
|
|
Price
|
Expenditure Type
|
|
|
Note to Buyer
|
Expenditure Org
|
|
|
Note to Receiver
|
Expenditure Item Date
|
|
|
Urgent
|
Distributions Descriptive Flexfields
|
|
|
Supplier
|
|
|
|
Supplier Site
|
|
|
|
Supplier Item
|
|
|
|
Buyer
|
|
|
|
Currency
|
|
|
|
Exchange Type
|
|
|
|
Exchange Date
|
|
|
|
Exchange Rate (for User Exchange Type)
|
|
|
|
Line Descriptive Flexfields
|
|
|
|
|
|
Limitations
· Update is limited to requisitions in ‘INCOMPLETE’ or ‘APPROVED’ status.
· No updates are allowed on a requisition that had been associated with a purchase order.
· No updates are allowed on an internal requisition that has an associated internal sales order.
· *Distribution accounts linked to item based lines cannot be updated.
· You cannot cancel a line in this mode.
· You cannot delete a line. You will need to set the quantity or price to zero as a workaround.
Note:
If updating the Destination Organization, ensure the existing Location is valid for the selected organization, otherwise select a valid location.
To update the data detailed above, you first need to select the ‘Wizard Mode’ of ‘Update Requisition’ from the Requisition Wizard ribbon. On the ribbon, click on the default ‘Requisition’ mode, then select the ‘Mode’ of ‘Update Requisition’ on the ‘Generate template’ form.
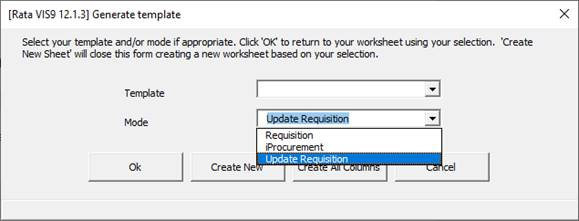
Click the ‘Create New’ or ‘Create All Columns’ button and click ‘OK’.
a) Use the ‘Download’ form or ‘Download using sheet data’ button to download existing Requisitions. You can then use one of the methods below to update the Requisition information.
b) Type or paste data directly into the cells provided. No validation is performed until you run the upload program or open the Header, Line or Distributions form.
c) Use the forms provided to enter the data for the Requisitions. Data is validated and lists of values are available. To enter data in this way first position your cursor on the row you wish to contain the Requisition data. Then double-click in one of the cells or alternatively click on the ribbon button.
Worksheet Layout and Forms
Results Section
The first three columns in your worksheet are used by the Wizard to provide the Status message for each of the sections (Header, Line and Distributions).
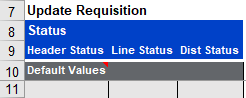
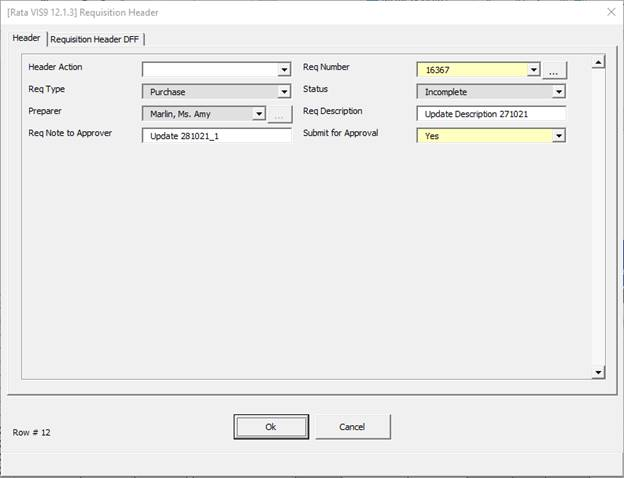
Header Section

The Header section holds the Message, ID and Header details. Use one of the methods mentioned above to enter or update data in the header section.
Enter ‘Update’ in the Header Action field if you are updating header data. If you have opened the form then either enter the data directly into the form or select from the list of values provided.
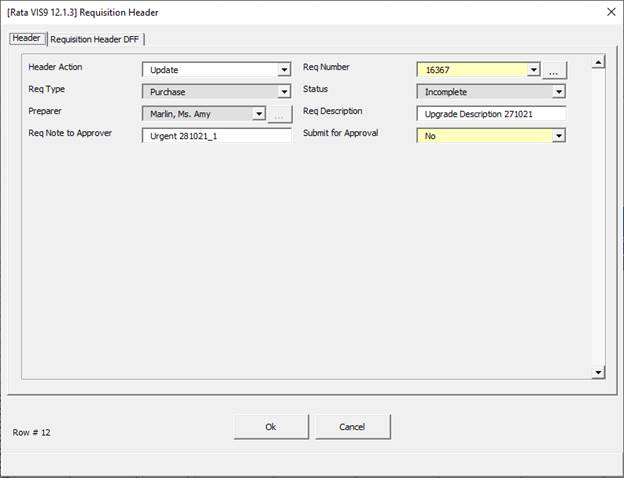
Click ‘Ok’ to write the details into your worksheet, or click the ‘Cancel’ button to ignore the details entered and return to the worksheet.
Lines Section


Enter ‘Update’ in the Line Action field if you are updating data in the Lines section.
To update details in the Lines section you must have the associated ‘Req Number’ in the header section.
Enter data directly into the worksheet
OR
Open the Requisition Lines form by double-clicking in a field in the lines section or clicking the ‘Forms’ icon and selecting ‘Lines Form’, on the Requisition Wizard Ribbon.
If you have opened the form, either enter the values directly into the form or select from the list of values provided.
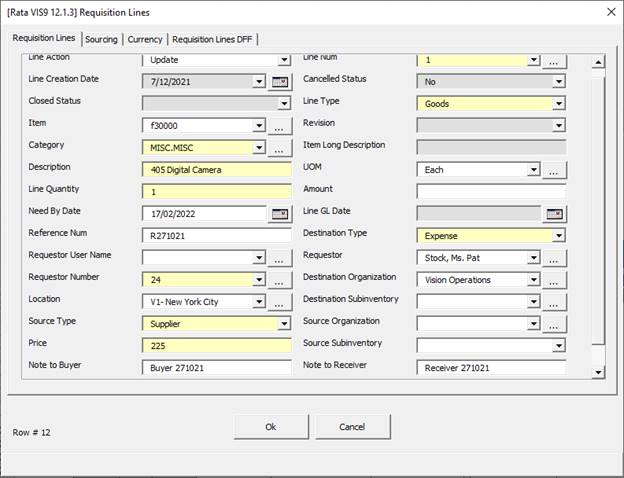
Select ‘Ok’ to write the details into your worksheet or select the ‘Cancel’ button to ignore the details entered and return to the worksheet.
Distributions Section

Enter ‘Update’ in the ‘Dist Action’ field if you are updating data in the Distributions section.
If there are multiple distributions associated to a line, enter ‘Update’ in every distribution row.
*Note: Distribution accounts linked to item based lines cannot be updated. A warning message will display to alert you.
Enter the data directly into the worksheet or double-click in one of the columns in the ‘Distributions’ section and the form will display. If you have opened the form either enter the values directly into the form or select from the list of values provided.
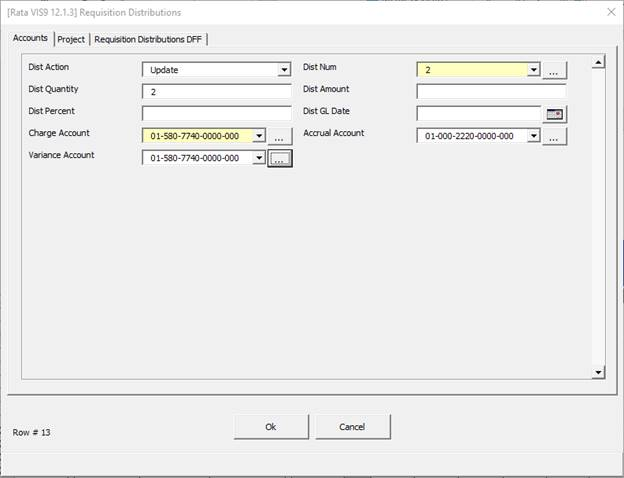
Select ‘Ok’ to close the form and write the details into your worksheet, or select the ‘Cancel’ button to ignore the details entered and return to the worksheet.
After completing your worksheet upload the data by referring to the Upload Purchase Orders section of this document.
Submit for Approval
There is the option to submit the updated requisitions for approval via the Wizard. Prior to the upload, ensure the column ‘Submit for Approval’ in the Header section is set to ‘Yes’. Additionally, the ‘Header Action’ column must be ‘Update’. You will be prompted with a warning message: “Header Action must be "Update" if Submit for Approval is "Yes".
The default value is “No”.
Note: The Wizard does not execute any validation in the approval process. The value ‘Yes’ is passed to the Submit for Approval parameter and the Oracle API will call the approval workflow based on the setup in the client’s environment. Any updates that are not approved will have to be manually approved in Oracle.