|
|||||
|
|||||

|
1.0 Ribbons
| ||||||||
|
Step
|
Task
| |||||||
|
1.1
|
Open the Wizard Workbook.
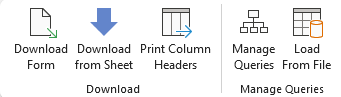
The User Documentation contains a description of each icon on the ribbon and its function.
| |||||||
|
1.2
|
You may need to enable macros.
The Setup, Product and Custom Query menus will be available under three ribbons:
AR Invoice Wizard - Setup ribbon:
 AR Invoice Wizard ribbon:
 Custom Query ribbon:
 | |||||||
|
2.0 Enter and Upload Standard Transactions
| ||||||||
|
Step
|
Task
|
Screenshot
| ||||||
|
2.1
|
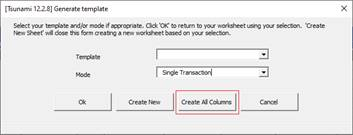
Click the ‘Select Template’ button (This may be set to ‘Single Transaction’, ‘Batch Transaction’, ‘Credit Transaction’, ‘Apply Credit Memo’ or ‘Create and Apply Credit Memo’).
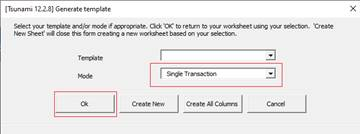
The ‘Generate template’ form will open and select ‘Single Transaction’ and click ‘Create All Columns’.
Name the sheet ‘Invoice Entry’.
|
  | ||||||
|
2.2
|
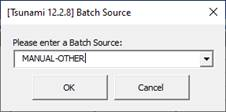
Enter the Batch Source Name in cell ‘B6’
OR
Double-click in cell B6 and choose from the list of values. Click ‘OK’.
|
 | ||||||
|
2.3
|
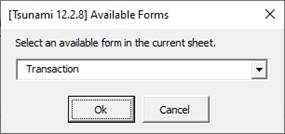
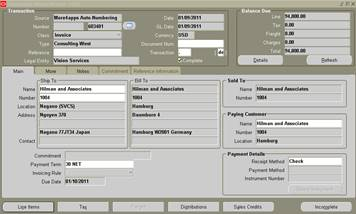
Place the cursor anywhere in the Transaction section on a blank row and either double-click in this row or click the ‘Forms’ icon and select ‘Transaction’.
Click ‘Ok’ to open the ‘Transaction’ form.
The Wizard forms validate the data using lists of values, date formats, field lengths and some other field level validation. The relevant form tab for the cell clicked will be in focus in the form.
|
 | ||||||
|
2.4
|
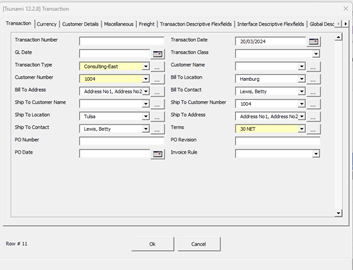
On the ‘Transaction’ tab enter the following data:
GL Date: Leave blank for the API to default
Transaction Type: % then click … button and select from the LOVs.
Customer Number:
Bill To Location:
Bill To Address: Enter ‘%’ then click ... button and select a value from the LOV.
Ship To Cust Number: Enter data and tab
Ship To Location, Ship To Address, and Ship To Contact (if exists) will default
Terms: % then click … button and select from the LOV
(In this instance the Transaction Number could be created automatically after upload, due to the Batch Source selected in step 2.2)
|
 | ||||||
|
2.5
|
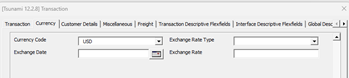
Click on the ‘Currency’ tab.
Ensure the Currency Code has defaulted.
|
 | ||||||
|
2.6
|
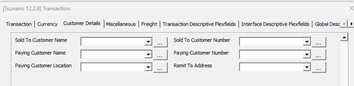
Click on ‘Customer Details’ tab.
(This records further customer details such as ‘Paying Customer’ and ‘Sold To’ data - if required)
Don’t enter any data in this region.
|
 | ||||||
|
2.7
|
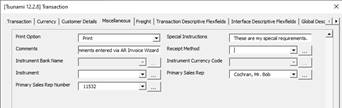
Click on the ‘Miscellaneous’ tab.
(Data entered here will populate fields in the “Main” and “More” tabs of the Receivables Invoice Header in the Oracle form).
Enter the following information:
Print Option:
Special Instructions: These are my special requirements.
Comments: These are my comments entered via AR Invoice Wizard
Note: Sales Rep Name and Number may default depending on instance settings
|
 | ||||||
|
2.8
|
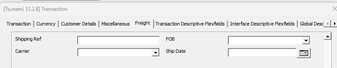
Click on the ‘Freight’ tab.
(This records freight information for the Invoice which can be found when clicking the ‘Freight’ button on the invoice header in Receivables)
Don’t enter any data in this region.
Click ‘Ok’ to save the data and close the form.
|
 | ||||||
|
2.9
|
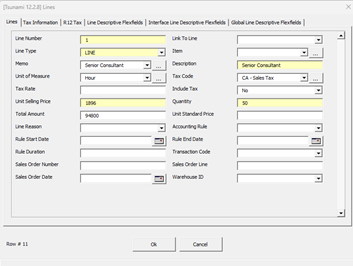
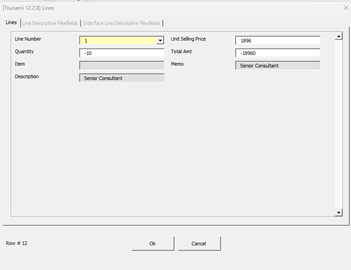
Place the cursor anywhere in the Lines section on the same row as the header info, and either double-click on this row or click the ‘Forms’ icon and select ‘Lines’ to open the ‘Lines’ Form.
Enter the following information:
Line Number: 1 (will default)
Line Type: LINE
Memo: enter data. This will default Description and Unit of Measure
Tax Code:
Include Tax: No
Unit Selling Price: 1896
Quantity: 50
Total Amount: 94800 (will calculate automatically)
Click ‘Ok’ to close the form.
|
 | ||||||
|
2.10
|
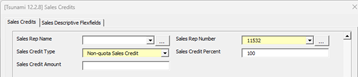
Place the cursor anywhere in the Sales Credits section on the same row as the header info, and either double-click on this row or click the ‘Forms’ icon and select ‘Sales Credits’ to open the ‘Sales Credits’ Form.
Enter the following information:
Sales Rep Number:
Sales Credit Type: Non-quota Sales Credit
Sales Credit Percent: 100
Click ‘Ok’ to close the form.
Demo Note: The Oracle API will accept either amount or percent or both if in sync as it ignores the controls on the batch source.
|
 | ||||||
|
2.11
|
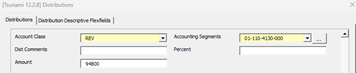
Place the cursor anywhere in the Distributions section on the same row as the header info, and either double-click on this row or click the ‘Forms’ icon and select ‘Distributions’ to open the ‘Distributions’ Form.
Enter the following information:
Account Class:
Accounting Segments:
Amount: 94800
Demo Note: The Oracle API will accept either amount or percent or both if in sync as it ignores the controls on the batch source.
Click the ‘Ok’ button to close the form.
Note the Status fields show Validated.
|
  | ||||||
|
2.12
|
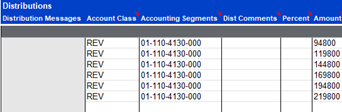
Copy all the data on the row down five more rows to create six single lines, single distribution invoices.
We will now change the invoice amounts of the new rows to make it easier to identify the different invoices in Receivables.
Change the ‘Unit Selling Price’ value in row 12 (the 2nd row) to the following formula:
=EN11+500
Where 'CI' is the 'Unit Selling Price' column and Row11 is the original manually entered invoice line.
Apply the formula down to the rest of the entered rows. The Unit Selling Price should be incremented by $500 for each subsequent invoice.
Clear all data in the ‘Total Amount’ fields, as these amounts will calculate on validation.
|
 | ||||||
|
2.13
|
Enter the following formula into the row 12 ‘Amount’ field in the Distribution Lines section.
=BU12*BV12
Where 'CI' is the ' Unit Selling Price' column and 'CJ' is the 'Quantity' column and Row12 is the original manually entered invoice line.
Copy this down to the other five rows so Total Amount and Amount calculations will balance after validation.
|
 | ||||||
|
2.14
|
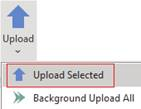
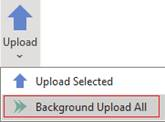
With the cursor select all six rows, and on the ribbon click ‘Upload’ and select ‘Upload Selected’.
This does the final validation and upload.
|
 | ||||||
|
2.15
|
The Invoice Statuses will update to Accepted once the Invoices have been imported into Receivables.
Note – The Transaction Numbers will be populated back into the spreadsheet ‘Transaction Number’ column (this batch source has auto-numbering of transaction numbers).
Keep a record of these numbers for section 6 of this demo.
|
 | ||||||
|
2.16
|
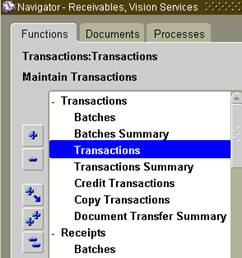
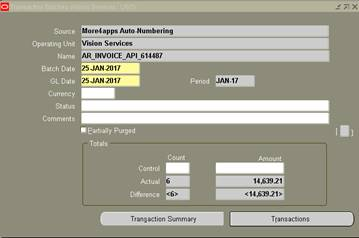
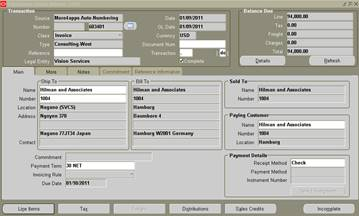
Demonstrate by logging in to Oracle.
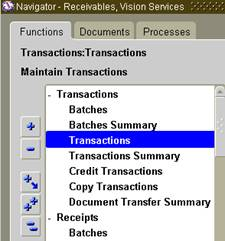
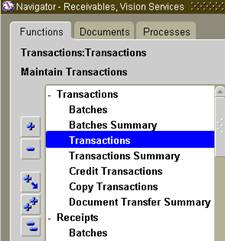
Navigation:
Ø Transactions > Transactions
|
| ||||||
|
2.17
|
Go into query mode (F11) enter an Invoice Number and execute the query (Ctrl F11).
Move around the form to display the Distribution Lines and Sales Credits.
|
  | ||||||
|
3.0 Upload Bulk Batch Transactions with Multiple Lines and Distributions
| ||||||||
|
As we have already covered a lot of the basic steps, we won’t be repeating the Demo of that functionality in this section.
Note: This worksheet displays only the relevant columns required for this Demo.
| ||||||||
|
Step
|
Task
|
Screenshot
| ||||||
|
3.1
|
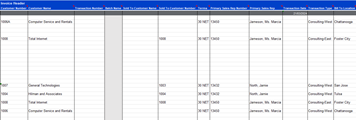
This is an example of using a worksheet with bulk data.
The Batch Source Should already be set to ‘MANUAL-OTHER’.
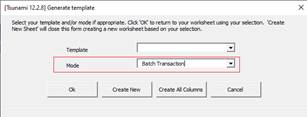
Click the ‘Select Template’ icon on the ribbon and select Mode of ‘Batch Transaction’.
Click ‘Ok’ to close the form.
Note: On the worksheet, there is a formula in the Default row for Transaction Date (set to Today’s date). This is to mitigate any errors where the transaction date is earlier than dependent data and there are a lot of Dependencies on Trx Date in this C3 version.
|
  | ||||||
|
3.2
|
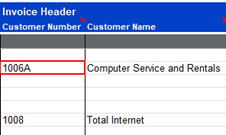
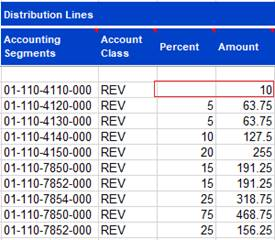
Note the following intentional data entry errors:
1) Customer Number on the first transaction (row 12) displays “1006A”. “1006 is the correct number”.
2) The Distribution ‘Amount’ for row 16 from is 10 and the ‘Percent’ value has been removed. (This will not balance with the transaction line).
|
  | ||||||
|
3.3
|
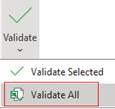
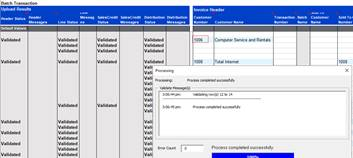
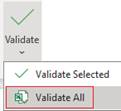
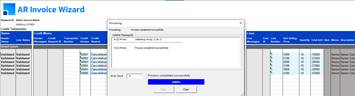
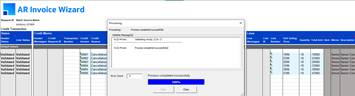
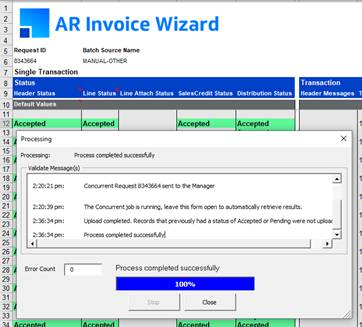
Click the ‘Validate’ icon and select ‘Validate All’ from the dropdown on the ribbon.
|
 | ||||||
|
3.4
|
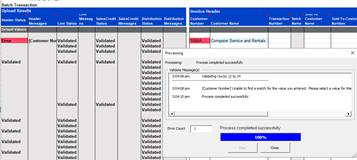
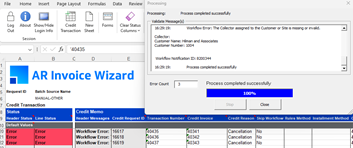
An error will appear for the invalid ‘Customer Number’ and dependent fields.
Note: The discrepancy between the ‘Total Amount’ and distribution amount that was changed has not errored. This is handled by Oracles public API and an error is expected on ‘Upload’.
Close the Processing Form.
The Processing Status fields will be populated with a Validated status for the transactions that passed validation.
|
 | ||||||
|
3.5
|
Change the ‘Customer Number’ to 1006 (or your preferred customer number).
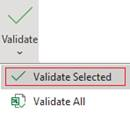
Highlight row 12 and select the Validate Option of ‘Validate Selected’ from the dropdown on the ribbon.
Success!
|
  | ||||||
|
3.6
|
Now we are ready to upload – expecting an error from the API regarding the mismatch with the Total Amount and Distributions for row 16.
Highlight all rows and click the ‘Upload’ icon on the ribbon and select ‘Upload Selected’.
|
 | ||||||
|
3.7
|
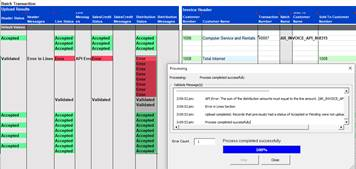
As expected, an error is returned from the API.
Note that any valid transactions are still uploaded and created in a batch. But any that fail, will be created with a new (different) batch name when upload is successful.
Click ‘Close’ on the Processing form.
|
 | ||||||
|
3.8
|
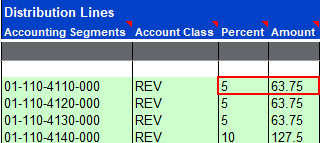
In the Distributions section, change the amount on row 16 to 63.75 and the Percent value to 5 (This should now balance with the transaction line).
|
 | ||||||
|
3.9
|
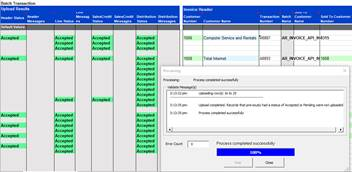
Upload again by putting the cursor on row 16. Click the ‘Upload’ icon on the ribbon and select ‘Upload Selected’.
Success!
As per 3.7. Note this transaction has been assigned a different Batch Name.
Click ‘Close’ on the processing form.
|
 | ||||||
|
3.10
|
Write down the transaction numbers that were just created - these will be used to create credits later in the Demo.
|
| ||||||
|
3.11
|
Now that all transactions and lines have a status of Accepted, demonstrate they exist in Receivables.
Navigation:
>Transactions > Batches
|
 | ||||||
|
3.12
|
Go into query mode (F11) enter the Batch Name from spreadsheet and execute the query (Ctrl F11).
Move around the form to display the distribution lines and sales credits.
|
 | ||||||
|
4.0 Enter and Upload On-Account Credit Memos and Apply to Invoice
| ||||||||
|
Step
|
Task
|
Screenshot
| ||||||
|
4.1
|
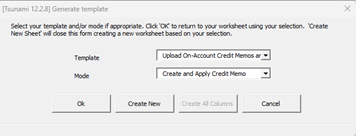
Click the ‘Select Template’ button.
Select ‘Upload On-Account Credit Memos and Apply to Invoice’ from the ‘Template’ LOVs.
The mode ‘Create and Apply Create Memo’ will default as the ‘Mode’.
Click ‘Create New’.
Note, this template has minimal columns to show the behavior rather than columns. All the same columns are available to use as Single Transaction Mode (apart from the columns in the ‘Apply’ section, which are only in this mode).
|
 | ||||||
|
4.2
|
Enter the Batch Source Name in cell ‘B6’
OR
Double-click in cell B6 and choose from the list of values. Click ‘OK’.
Open the ‘Transaction’ form by using the ‘Forms’ icon on the ribbon or double-clicking in the ‘Transaction’ section on the worksheet.
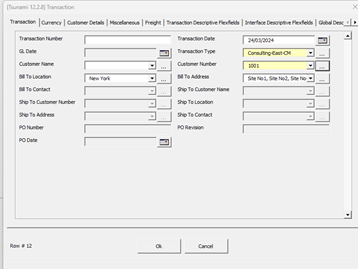
On the ‘Transaction’ tab in the form enter the following data:
Transaction Type: % then click … button and from the LOVs
Customer Number: Enter data then tab
Bill To Location and Bill To Address will default
Click Ok to close the form.
(In this instance the Transaction Number will be created automatically after upload, due to the Batch Source selected)
|
 | ||||||
|
4.3
|
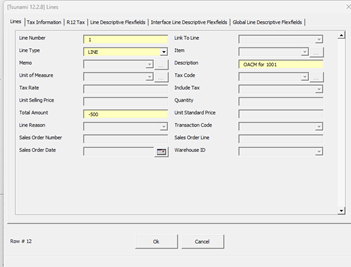
Place the cursor anywhere in the Lines section on the same row as the header info, and either double-click on this row or click the ‘Forms’ icon and select ‘Lines’ to open the ‘Lines’ Form.
Enter the following information:
Line Number: 1 (will default)
Line Type: LINE
Description: OACM for 1001
Total Amount: -500
Click ‘Ok’ to save the data and close the form.
|
 | ||||||
|
4.4
|
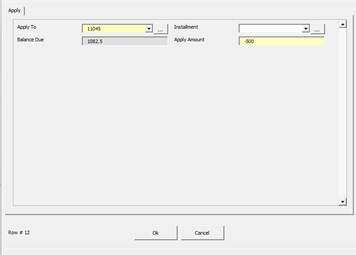
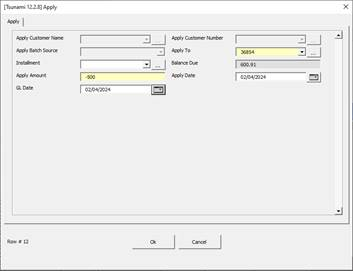
Place the cursor anywhere in the Apply section on the same row as the header info, and either double-click on this row or click the ‘Forms’ icon and select ‘Apply’ to open the ‘Apply’ Form.
Enter the following information:
Apply To: Enter % and search – select any transaction number > $500 from the LOV and tab.
Balance Due and Apply Amount will default.
Click ‘Ok’ to close the form.
|
 | ||||||
|
4.5
|
Highlight the row with the data and select the ‘Upload’ icon and select ‘Upload Selected’ on the ribbon.
|
| ||||||
|
4.6
|
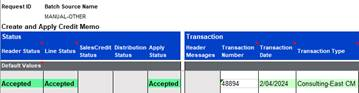
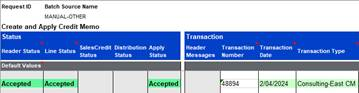
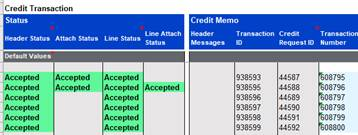
The Upload is successful and Header, Line and Apply status all show Accepted.
|
 | ||||||
|
5.0 Create and Upload Applied Credit Memos
| ||||||||
|
Step
|
Task
|
Screenshot
| ||||||
|
5.1
|
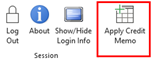
Click the ‘Generate Template’ button on the ribbon. (This will be set to ‘Create and Apply Credit Memo’).
Select the mode ‘Apply Credit Memo’.
Click ‘Create New’.
|
 | ||||||
|
5.2
|
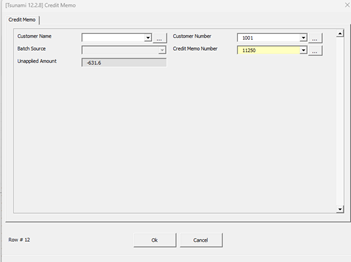
Open the ‘Credit Memo’ form by using the ‘Forms’ icon on the ribbon or double-clicking in the ‘Credit Memo’ section on the worksheet.
Enter the following data:
Customer Number:
Credit Memo Number: % and search – select value > -500
Click ‘Ok’ to close the form.
|
 | ||||||
|
5.3
|
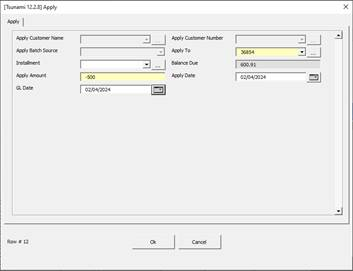
Place the cursor anywhere in the Apply section on the same row as the header info, and either double-click on this row or click the ‘Forms’ icon and select ‘Apply’ to open the ‘Apply’ Form.
Enter the following information:
Apply To: Enter % and search – select any transaction number > $500 from the LOV and tab
Apply Amount: -500
Apply Date: Today’s date
GL Date: Today’s date
Click ‘Ok’ to save the entered data.
|
 | ||||||
|
5.4
|
Highlight the row with the data and select the Upload Option of ‘Upload Selected’ from the dropdown on the ribbon.
|
| ||||||
|
5.5
|
The Upload is successful and Apply Status shows as Accepted.
|
 | ||||||
|
6.0 Download Transactions without Applications and Apply Credit (with Attachments)
| ||||||||
|
Step
|
Task
|
Screenshot
| ||||||
|
6.1
|
Click the ‘Select Template’ icon on the ribbon.
Select ‘Credit Transaction’ from the ‘Mode’ LOV’s.
Click ‘Create All Columns’.
|
 | ||||||
|
6.2
|
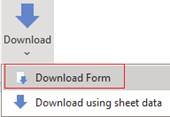
Click the ‘Download’ icon on the ribbon and select ‘Download Form’.
|
 | ||||||
|
6.3
|
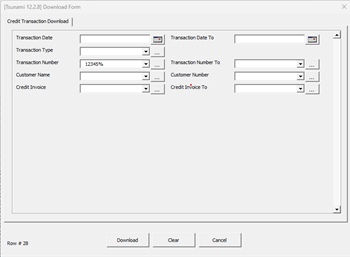
Locate the transaction numbers from the invoices created in Step 2.15 (above).
In Transaction Number enter all but the last digit of noted transaction numbers appended with a % and click the ‘Search’ button.
i.e. if the transaction numbers were 123451, 123452, 123453, 123454, 123455, 123456. Enter ‘12345%’
More than six records may be returned. This is ok.
Click ‘Download’.
|
 | ||||||
|
6.4
|
See that the information has been downloaded for those invoices.
Remove any invoices and associated lines that do not have the same transaction numbers as per Step 2.15 (above), by highlighting the rows and deleting them.
|
 | ||||||
|
6.5
|
Note - If the user clears the data in the ‘Transaction Number’ and ‘Line ID’ columns, the data can then be re-used to create new transactions.
|
 | ||||||
|
6.6
|
We will now cut and paste the ‘Transaction Number’ column to the ‘Credit Invoice’ column.
Note: This is so the Invoice to be credited for the first time is in the right column to credit and a new invoice number can be entered/populated once the Credit has been applied and a new number generated.
Remove anything from the ‘Line ID’ column.
|
 | ||||||
|
6.7
|
Ensure that the Batch Source is set in cell B6.
|
 | ||||||
|
6.8
|
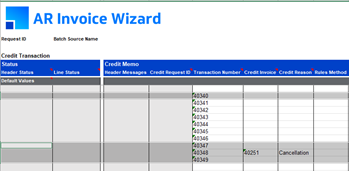
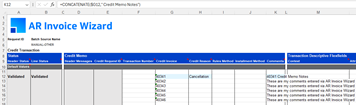
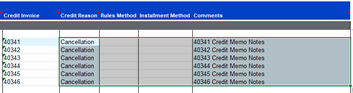
On row 12 (for the 1st line of data), manually enter the following information:
Credit Reason: Cancellation
Comments: Update to ‘=CONCATENATE($G12,"Credit Memo Notes")’ enter to populate the formula result
|
 | ||||||
|
6.9
|
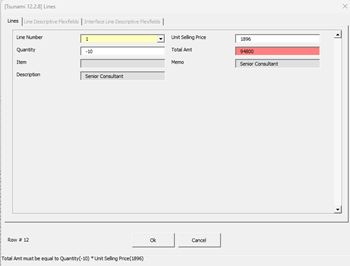
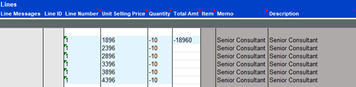
Place the cursor anywhere in the Lines section on the same row as the header info, and either double-click on this row or click the ‘Forms’ icon and select ‘Lines’ to open the ‘Lines Form.
Update the following information:
Quantity: Update to ‘-10’
This will error as the Total Amount no longer = Unit Selling Price*Quantity
|
 | ||||||
|
6.10
|
Clear the ‘Total Amount’ field from the form and tab. A new ‘Total Amount’ will be calculated and not appear as invalid.
Click ‘Ok’ to save the entered data and close the form.
Remove all data in the ‘Total Amount’ fields for the other invoices.
|
 | ||||||
|
6.11
|
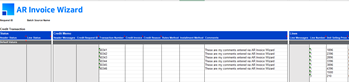
In the ‘Credit Memo’ section highlight H12-K12 and drag down to row 17 to update the remaining headers.
|
 | ||||||
|
6.12
|
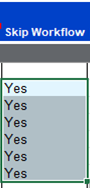
Anywhere in the Credit Memo section, insert a new column and name it ‘Skip Workflow’.
Populate this with the value ‘Yes’ for all records.
Note: For the purposes of this demo, this is to skip any workflows that are setup that will leave invoices in a pending state while the process completes.
|
 | ||||||
|
6.13
|
In the ‘Lines’ section, clear the data in cells Z13-Z18 (Total Amount).
Highlight cell Y12 (Quantity) and copy down to update the Quantities of the remaining Invoice lines.
|
 | ||||||
|
6.14
|
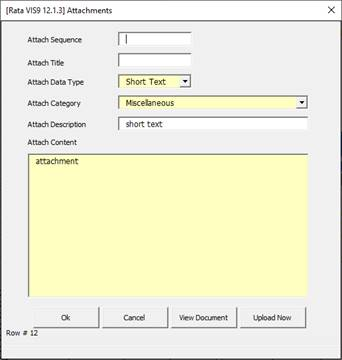
Open the Attachment form and enter information for an attachment.
Can also add multiple attachments.
|
 | ||||||
|
6.15
|
On the ribbon click the ‘Validate’ icon and select ‘Validate All’.
|
 | ||||||
|
6.16
|
Note: The Line Amounts have all updated on validation and validation returns a successful result.
|
 | ||||||
|
6.17
|
Now all data is successfully validated, it is time to upload.
Select all the entries in the Credit Invoice column and from the ribbon click ‘Upload’ and select ‘Upload Selected’.
|
 | ||||||
|
6.18
|
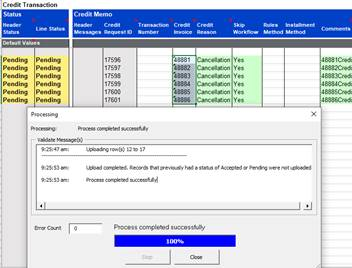
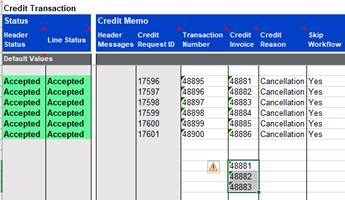
The Status columns will print statuses of Pending as these records require a refresh (this is due to the system determining if they need to stay Pending or if they complete as Accepted, due to system workflow processes).
Close the Processing form.
Note the Credit Request ID that is returned to the sheet.
|
 | ||||||
|
6.19
|
Leave the selected invoices highlighted and select ‘Credit Refresh’ from the
ribbon.
This checks the Credit Request IDs to see if they are still in a workflow process or complete/Accepted.
|
 | ||||||
|
6.20
|
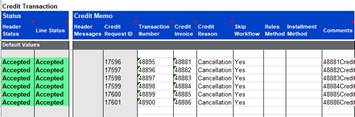
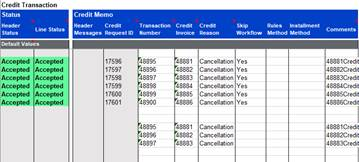
As the workflow is skipped as per step 10, the transactions are all Accepted.
|
 | ||||||
|
6.21
|
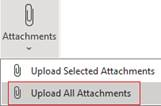
Click the Attachments icon on the ribbon and select Upload All Attachments.
An Accepted Status will show in the Attach Status columns.
|
  | ||||||
|
7.0 Enter Transactions with Applications to Apply Additional Credit
| ||||||||
|
Step
|
Task
|
Screenshot
| ||||||
|
7.1
|
Use the same sheet as the previous section 6.
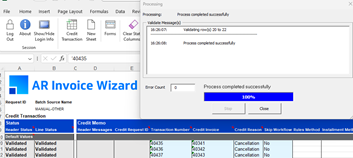
Copy the first three numbers from the Credit Invoice column. These will now be valid in this column as they had credits applied in step 6.
Put the cursor on a blank row below the downloaded down (in this example cell G20) and paste the numbers.
|
 | ||||||
|
7.2
|
Highlight the three numbers and on the ribbon click ‘Download’ and select ‘Download using sheet data’.
|
 | ||||||
|
7.3
|
Note what downloaded for those invoices.
There are Transaction Numbers for the previously associated credits and the original Transaction Numbers in the Credit Invoice column. The comments have updated as per the last demo.
Clear any data in the ‘Transaction Number’ and ‘Line ID’ columns.
This data can now be re-used to create additional new credit applications for the same transactions.
|
 | ||||||
|
7.4
|
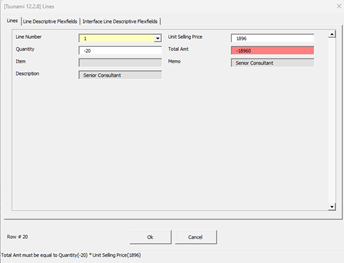
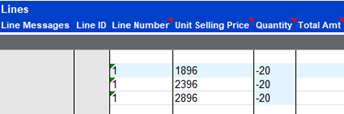
Place the cursor anywhere in the Lines section on row 20 (first transaction that was downloaded earlier), and either double-click on this row or click the ‘Forms’ icon and select ‘Lines’ to open the ‘Lines’ form.
Update the following information:
Quantity: -20
This will error as the Total Amount no longer = Unit Selling Price*Quantity
|
 | ||||||
|
7.5
|
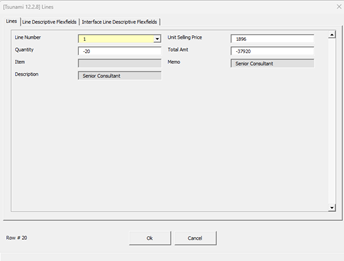
Clear the Total Amount field from the form and tab. A new Total Amount will be calculated and not appear as invalid.
Click ‘Ok’ to save the entered data and close the form.
|
 | ||||||
|
7.6
|
In the ‘Credit Memo’ section set Skip Workflow to No for the three records.
Note: For the purposes of this demo, this is to invoke any workflows that are setup that will leave invoices in a pending state while the process completes
|
 | ||||||
|
7.7
|
In the ‘Lines’ section, clear the data in the ‘Total Amount’ column for the remaining three transactions downloaded earlier.
Highlight the ‘Quantity’ cell for the first transaction and copy down to update the Quantities of the remaining Invoice lines.
|
 | ||||||
|
7.8
|
With the three records highlighted, on the ribbon click ‘Validate’ and select ‘Validate Selected’.
|
 | ||||||
|
7.9
|
This now validates successfully.
|
 | ||||||
|
7.10
|
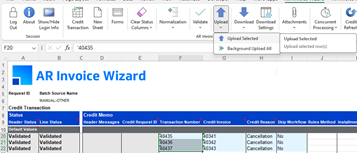
Now all data is successfully validated, we will now upload the data.
Select all the entries in the Credit Invoice column and on the ribbon click ‘Upload’ and select ‘Upload Selected’.
|
 | ||||||
|
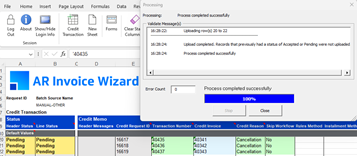
7.11
|
The Status columns will show Pending as these records require a refresh (this is due to the system determining if they need to stay Pending or if they complete as Accepted, due to system workflow processes).
Close the Processing form.
Note the Credit Request ID that is returned to the sheet.
|
 | ||||||
|
7.12
|
Leave the selected invoices highlighted and click ‘Credit Refresh’ on the
ribbon.
This checks the Credit Request IDs to see if they are still in a workflow process or complete/Accepted.
|
| ||||||
|
7.13
|
As the workflow is not skipped as per step 10, the transactions all fail with workflow errors.
In this case the error is quite specifically a set up error against the customer and needs to be rectified for the workflow to continue.
In other cases it can be because the approval process is awaiting action from the next step in the process.
This part of the demo ends here due to the errors, intentionally highlighting how we can identify errors/roadblocks in the workflow.
|
 | ||||||
|
8.0 Background Upload All
| ||||||||
|
Step
|
Task
|
Screenshot
| ||||||
|
8.1
|
This is an example of using our own worksheet for functionality of ‘Background Upload All’.
Click the ‘Generate Template’ icon and select mode of ‘Single Transaction’, then click ‘Ok’ to close the form.
The ‘Batch Source Name’ in cell B6 should read:
MANUAL-OTHER
|
  | ||||||
|
8.2
|
This is to show how to upload all data. ‘Background Upload All’ is the only option other than selecting all on the sheet.
Click on the ‘Upload’ icon and select ‘Background Upload All’ on the ribbon.
|
 | ||||||
|
8.3
|
Invoices that have had no errors during upload will show a status of Accepted for Invoices, On Account Credit Requests and Applied Credit Requests crediting a specific invoice.
Click ‘Close’.
|
 | ||||||
|
8.4
|
Demonstrate by logging in to Oracle.
Navigation:
Ø Transactions > Transactions
|
 | ||||||
|
8.5
|
Go into query mode (F11) enter an Invoice Number and execute the query (Ctrl F11).
Move around the form to display the distribution lines and sales credits.
|
 | ||||||

