|
1. Create a new Worksheet
All worksheets are created from templates based on the ‘Wizard Mode’ selected.
Use the following steps to create your own customized template for your organization.
|
|
Step
|
Task
|
Screenshot
|
|
1.1
|
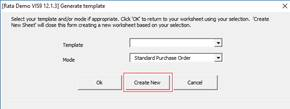
Click the ‘Select Template’ button on the PO Wizard ribbon.
This opens the ‘Generate template’ form.
Change the ‘Mode’ to ‘Standard Purchase Order’ and click ‘Create New’.
|
|
|
1.2
|
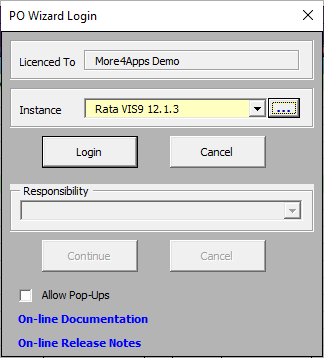
The following screen may appear when the above action is undertaken. This indicates that you are not logged into your Oracle Instance of Oracle.
Select the correct Oracle Instance from the drop-down list provided, click on the Login button and enter your Username and Password.
Select a Responsibility and click ‘Continue’.
|
|
|
1.3
|
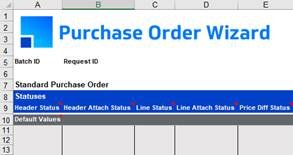
A new sheet will be created with the Template title in Row 7.
|
|
|
2. Download a Standard Purchase Order and associated lines
Now we have created a worksheet we will download existing Purchase Orders into our worksheet. Refer to section: Download Purchase Orders
|
|
Step
|
Task
|
Screenshot
|
|
2.1
|
There are two methods provided to download existing Purchase Orders.
One method uses a Form and the other uses the ‘PO Number’ column of the worksheet to determine the Purchase Order(s) to be downloaded.
We will use the ‘Download using sheet data’ option in this demonstration.
|
|
|
2.2
|
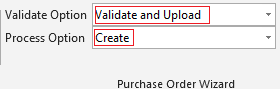
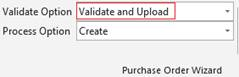
Select ‘Validate Option’ of ‘Validate and Upload’ and ‘Process Option’ of ‘Create’.
|
|
|
2.3
|
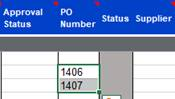
Enter two PO Numbers onto the worksheet in the ‘PO Number’ column.
Highlight the two rows.
|
|
|
2.4
|
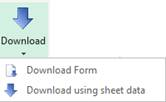
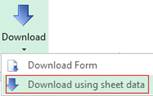
Click the ‘Download’ icon and select ‘Download using sheet data’ from the ribbon.
|
|
|
2.5
|
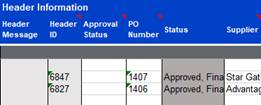
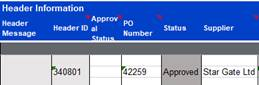
The selected Purchase Orders will now be displayed in your worksheet.
|
|
|
3. Create a new Purchase Order using the downloaded record
We will now use the downloaded Purchase Orders to create new Purchase Orders.
|
|
Step
|
Task
|
Screenshot
|
|
3.1
|
We will now modify the existing Purchase Orders to create new Purchase Orders.
In the worksheet remove the IDs for the following sections:
Header ID
Line ID
Ship ID
Dist ID
Header
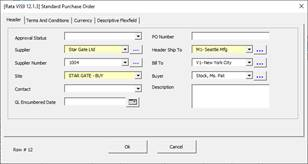
Double-click on a row holding the PO in the Header section. This will open the Header form.
1) Depending on your instance of Oracle either remove the PO Number and leave this blank or enter an appropriate PO Number.
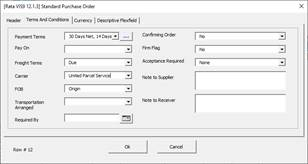
2) Select the ‘Terms and Conditions’ tab and change the ‘Payment Terms’ and ‘Carrier’.
Click ‘Ok’. This will write the changes into your worksheet.
Make the same changes to the second Purchase Order.
|
|
|
3.2
|
Lines
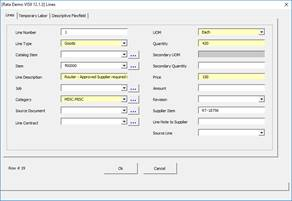
Open the Lines form by either clicking the ‘Form’ icon then select ‘Lines’ on the ribbon, OR double-click on a row holding the PO Lines.
Make changes to the ‘Quantity’ and ‘Price’ for this line and any other line.
Close the form by clicking ‘Ok’.
|
|
|
3.3
|
Shipments
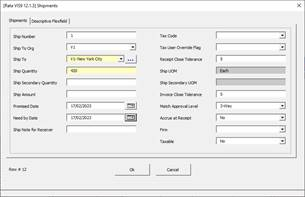
Open the ‘Shipments’ form by either clicking the ‘Forms’ icon and selecting ‘Shipments’ on the ribbon OR by double-clicking on a row in the Shipments section.
Make the following changes:
1) Change the ‘Ship Quantity’ - Note the total Ship Quantity for each line must equal the Line Quantity.
2) Change/enter a ‘Promised Date’ to a date in the future.
3) Change/enter a ‘Need By Date’ to a date in the future.
Undertake this for each of the Shipment lines.
|
|
|
3.4
|
Distributions
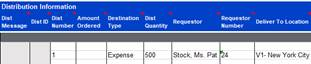
Scroll to the Distributions section and change the ‘Dist Quantity’ directly into the worksheet.
Note - The total Dist Quantity for each shipment must equal the associated Shipment Quantity.
|
|
|
4. Load the new Purchase Order into the Interface Table
We now have two PO’s which are ready to be uploaded into Oracle, but first we need to load the data into the interface table. Refer to Section: Upload Purchase Orders
|
|
Step
|
Task
|
Screenshot
|
|
4.1
|
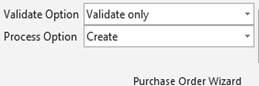
Change the ‘Validate Option’ to ‘Validate only’ and ensure the ‘Process Option’ is ‘Create’.
|
|
|
4.2
|
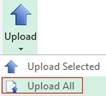
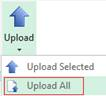
Click the ‘Upload’ icon and select ‘Upload All’ on the PO Wizard ribbon.
This button will validate all PO’s on your worksheet.
If you wish to upload only one or a range of PO’s on your worksheet, highlight the PO’s you wish to upload and click the ‘Upload’ icon and select ‘Upload Selected’ on the PO Wizard ribbon.
|
|
|
4.3
|
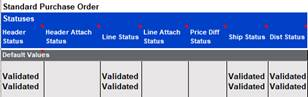
The status of the Header, Lines, Shipments and Distributions will show as Validated.
|
|
|
4.4
|
Change the ‘Validate Option’ to ‘Validate and Upload’ on the PO Wizard ribbon.
|
|
|
4.5
|
Click the ‘Upload’ icon and select ‘Upload All’ on the PO Wizard ribbon.
This button will upload all PO’s on your worksheet.
|
|
|
4.6
|
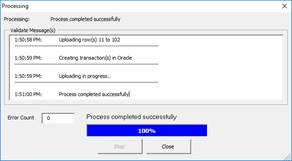
The Processing form will complete saying ‘Process completed successfully’.
Click ‘Close’.
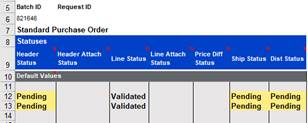
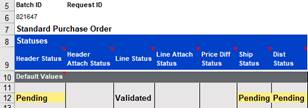
The status columns will now show as Pending as they have been loaded into the interface table.
The worksheet now has a Batch ID populated.
|
|
|
5. Run the Concurrent Manager
The PO’s are now loaded into the Interface Table.
We will now run the concurrent program to transfer the data into Oracle.
|
|
Step
|
Task
|
Screenshot
|
|
5.1
|
Click on the ‘Submit Concurrent Program’ button on the PO Wizard ribbon.
|
|
|
5.2
|
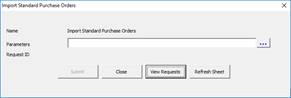
The ‘Import Standard Purchase Orders’ form will display.
Click the Parameters ... button.
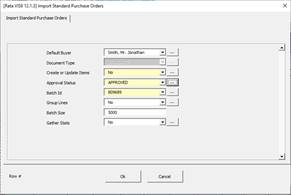
The ‘Import Standard Purchase Orders’ form will display.
Enter the following:
1) Create or Update Items – No
2) Approval Status – APPROVED
Default Buyer and Batch Id will already be populated.
Click ‘Ok’.
|
|
|
5.3
|
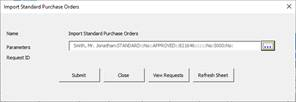
The ‘Import Standard Purchase Orders’ form will display.
Note - The Batch ID will form part of the ‘Parameter’ which will automatically display.
Click ‘Submit’.
|
|
|
5.4
|
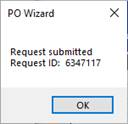
The Request ID will be provided and this will be written to the worksheet when you click ‘Close’.
|
|
|
5.5
|
Select the ‘View Requests’ button on the ‘Submit Request’ form.
The ‘Requests’ form will display.
When the phase is ‘Completed’ then close the form.
|
|
|
5.6
|
Click the ‘Refresh Interface Status’ button on the Purchase Order Wizard ribbon.
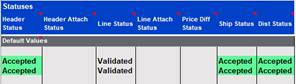
The Standard Purchase Orders will be created and have an Accepted status.
The user can check the data using Oracle or download the newly created Purchase Orders into your worksheet.
|
|
|
6. Add a new line to a Standard Purchase Order
|
|
Step
|
Task
|
Screenshot
|
|
6.1
|
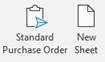
Create a new sheet by clicking the ‘New Sheet’ button on the PO Wizard ribbon.
Ensure the Wizard Mode is still ‘Standard Purchase Order’ as shown in the screenshot.
|
|
|
6.2
|
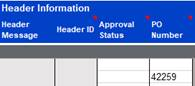
Enter one of the PO Numbers created earlier into the ‘PO Number’ column of the worksheet.
|
|
|
6.3
|
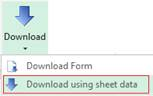
Place you cursor on the field that holds the PO Number and click the ‘Download’ icon and select ‘Download using sheet data’ on the PO Wizard ribbon.
|
|
|
6.4
|
The PO created earlier will be downloaded into your worksheet.
Remove the IDs in the worksheet for the following:
Line ID
Ship ID
Distribution ID
Scroll to the Lines section of your worksheet.
Leave one of the existing Lines, associated Shipments and Distributions in your worksheet. Remove all other lines and associated records.
We will now modify the existing line to create a new line.
|
|
|
6.5
|
Line Details
1) Change the line number to be the next number.
2) Change the Line Quantity and Price.
Shipment Details
Change the Ship Quantity to be the same as the Line Quantity.
If you have more than one shipment ensure that the total shipped is the same as the Line Quantity.
Distributions
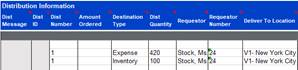
Change the ‘Dist Quantity’ to be the same as the Line Quantity.
If you have more than one distribution ensure that the total Distribution Quantities is the same as the Line Quantity.
|
|
|
6.6
|
Change the ‘Validate Option’ to ‘Validate and Upload’ and ‘Process Option’ change to ‘Update’.
|
|
|
6.7
|
Place your cursor on any row that holds the PO.
Click the ‘Upload’ icon and select ‘Upload Selected’.
|
|
|
6.8
|
PO will be validated with status Pending and a Batch ID will be populated in your worksheet.
|
|
|
6.9
|
Run the Concurrent Program as detailed in section 5.
|
|
|
6.10
|
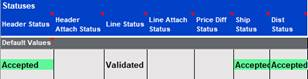
After refreshing the worksheet the status will be Accepted.
|
|
|
6.11
|
You can check the data using Oracle or download the newly created Purchase Orders into your worksheet.
|
|
|
End of Demonstration
|