AP Invoice Wizard - Setup Ribbon
The following table provides a quick reference to the AP Invoice Wizard Setup Ribbon and its functions.
 | ||
|
Button
|
Description/Functionality
| |
|
Setup Visibility
 |
Once your set-up is done you may not want your Users to change the set-up so you can hide the setup ribbon.
There are three options:
Show at Start-up – The setup menu always appears.
Hide at Start-up – The setup menu is hidden but can be found using:
View > Macros > ShowWizardToolbars and then click ‘Run’
Hide Permanently – The setup menu is hidden and cannot be displayed. Revert back to a copy of the original workbook to display the menu.
| |
|
Login Method
 |
Choose one of the following methods for logging in:
Standard Login - This will use single sign-on where available.
Alternative Login - This will use application level sign-on.
Standard Login (SSO Bypass) - This will use single-sign-on Bypass. This login method is available from Oracle EBS 11.5.9 onwards and can be used if you have SSO installed but want to bypass the SSO mechanism. The user will be authenticated to the internal FND_USERS table rather than the external SSO.
Default Browser Login - This will use the default browser on your PC to display the EBS Login page. This is the best method to use if the ‘Standard Login’ method does not work for you.
| |
|
Debug Upload
 |
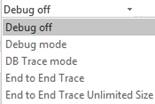
For the 5x ‘Debug Upload’ options mentioned below, the user will be under instruction from More4apps Support (used for Support purposes only). The default value is ‘Debug off’ unless instructed by More4apps to change:
Debug off – Disables any of the above options that are enabled.
Debug mode – Turns on the More4apps debug facility to generate debug messages to assist with product troubleshooting.
DB Trace mode – Generates a database trace for database Version 9i.
End to End Trace – Database trace generated for performance analysis and product troubleshooting.
End to End Trace Unlimited Size - This option allows the maximum size of trace files created whilst debugging to become unlimited. This resolves the scenario when trace files are too large that they were being truncated.
A message box will be displayed when this option is chosen allowing the user to cancel and not set the trace off:
“Please only use this under More4apps advice. A very large trace file may be created. If you are unsure, please use the End to End Trace’ option rather than the ‘End to End Trace Unlimited Size’ option”.
| |
|
Default Tax Codes
 |
There are two methods to choose from in the Default Tax Codes option:
Use Default Tax Codes
Ignore Default Tax Codes
When set to ‘Use Default Tax Codes’ this will respect the Tax Code default hierarchy set up in your Oracle Environment. However, if you enter Tax Code information into your sheet in the Wizard, this will override the Tax Code default hierarchy you have set up.
| |
|
Duplicate Headers
 |
Choose one of two methods of handling a Duplicate Header:
Include all Headers – To count a duplicate header as a new invoice.
Ignore Duplicate Header – To not count a duplicate header as a new invoice.
| |
|
Global DFF’s
 |
This option is provided to disable the global DFF’s which will save time caching and therefore improve the performance of the Wizard.
After changing this option, log out and log back in to the Wizard to set this option.
| |
|
Edit Template
|
This button will Show or Hide the Template worksheet. If you modify the master template, subsequent worksheets created (using the ‘New Sheet’ button) will be based on this template.
This sheet also stores the current logo that is used by default in the Wizard templates but can be changed at the user’s discretion.
This is common to all of our tools.
| |
|
Customize LOVs
|
This button will allow you to customize your list of values.
| |
|
Mandatory Fields
|
This button will allow you to select columns to be mandatory when entered on the worksheet.
| |
|
Number Format
|
Record the format of the current cell to use numeric values for the Amount/Quantity columns in the Wizard. You need to save the spreadsheet to keep the setting.
| |
|
Store Password
|
You can protect your worksheet after data-entry to prevent further changes. However, you must store the password in order to use the upload/validate functions.
Click on this button and store the password that you have used to protect the worksheet.
For further information refer to
| |
|
Export URL
|
Export Login Configuration Settings to New Sheet.
The login configuration allows you to store links to multiple instances of E-Business Suite. Create a new blank sheet (insert worksheet) and click on this button. The current login configuration will be copied into cell A1. This can then be copied into another workbook (into cell A1) and imported using the option below.
| |
|
Import URL
|
Import Login Configuration Setting from Current Setting.
The login configuration that has been copied into cell A1 of the current sheet will be used to set up the list of instances available in this workbook.
| |
Refer to section: