Correct Element Entry Errors after Upload
Once the element entries have been uploaded to the Batch Element Entry interface table, they will have a status of Pending. Lines with a status of Rejected at this stage will not have been loaded into the interface.
The following paragraphs outline a range of actions you may or may not need to take at this stage:
Delete an Element Entry that is ‘Pending’
Place the cursor on the row that you need to delete.
Click on the ‘Delete’ button.
The status of the line will be changed to Deleted and the ‘Line Number’ will be removed.
The element entries are deleted from the Batch Element Entry interface tables only.
Delete an Element Entry that is ‘Rejected’
A rejected record with no line number will not be in the interface table (and therefore does not need to be deleted from it). If you want to delete this record completely from your worksheet, you can simply highlight the row and use Excels ‘Edit, Delete Row’ function.
Change the data for an Element Entry that is ‘Rejected’
Use the Element Lines form to change the data for the element entry. Alternatively type or paste directly into the fields.
Place the cursor in the row, select ‘Validate and Upload’ and click on the ‘Upload’ icon and select ‘Upload Selected’ on the ribbon.
This row will attempt to be uploaded again. If it is successful it will get a status of Pending otherwise it will get a status Rejected.
Change the data for an Element Entry that is ‘Pending’
To change the data for an Element Entry that is Pending, first delete the record.
Place the cursor on the row that you need to delete.
Click on the ‘Delete’ button.
The status of the line will be changed to Deleted and the line number will be removed.
Use the Element Lines form to change the data for the element entry. Alternatively type or paste directly into the fields.
Place the cursor in the row, select ‘Validate and Upload’ and click on the ‘Upload’ icon and select ‘Upload Selected’ on the ribbon.
This row will attempt to be uploaded again. If it is successful it will get a status of Pending otherwise it will get a status of Rejected.
Add a new Element Entry
Simply add a new row to the spreadsheet using either the Element Lines form or pasting directly into the columns.
Place the cursor in the row, select ‘Validate and Upload’ and click on the ‘Upload’ icon and select ‘Upload Selected’ on the ribbon.
This row will attempt to be loaded. If it is successful it will get a status of Pending otherwise it will get a status Rejected.
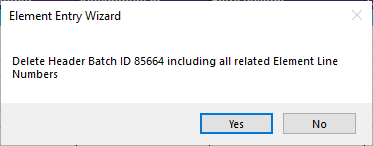
Delete an Entire Batch from the Interface
If you need to delete an entire Batch from the Batch Element Entry Interface, place the cursor on the Header row.
Click on the ‘Delete’ button.
The following message will be displayed:
Click the ‘Yes’ button. The rows will be marked as Deleted and the ‘Line Number’ will be removed. In the Batch Header Row the ‘Batch ID’ and ‘Object Version No’ fields will be empty.
You can subsequently change the data and re-load this batch if required.
Change the Element Header
You cannot update an element header that has already been loaded into the Batch Element Entry Interface. Any updates that you make to the header will have no effect.
To change any information on the Element Header (after upload), you should first delete the entire batch (see above), make your changes to the Element Header, and upload the element lines again.
Refer to section: