1. Before uploading the information in the worksheet, the user can validate the information using one of the following options on the ribbon. Click the Validate icon and select your option from the LOVs:
The choices are:
Validate Selected – Will validate selected row(s) in the current worksheet.
Validate All – Will validate all rows in the current worksheet.
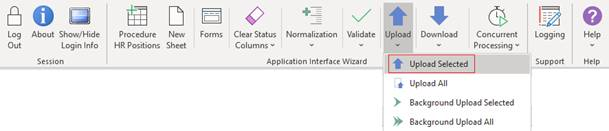
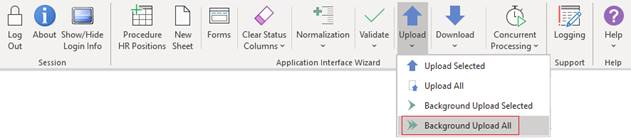
2. There are four options to Upload Records.
(a) Upload Selected records - Use your cursor to select the rows ready to be validated and loaded.
Select a Single Row
Place your cursor anywhere on a row containing the information you need to load. It does not have to be any particular column.
Select a Range of Rows
Use your cursor to highlight the rows you wish to upload. It does not have to be any particular column and you do not need to highlight the entire row. Use the Ctrl key or Shift key to select multiple rows.
Click the 'Upload’ icon and select ‘Upload Selected' on the ribbon to send the selected data to EBS.
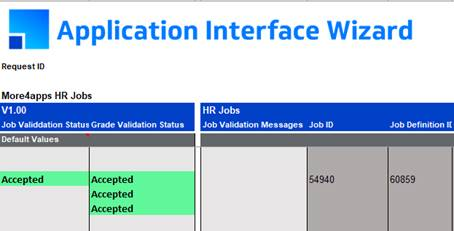
If the record is successfully uploaded, then a commit will be performed and there is no rolling back the transaction. The status Accepted will appear in the appropriate status columns, as per the example below:
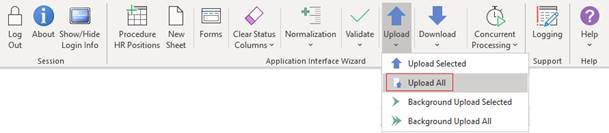
(b) Upload All records - Alternatively, to send all unprocessed rows to EBS simply click the ‘Upload’ icon and select 'Upload All' on the ribbon. This will validate and upload all records.
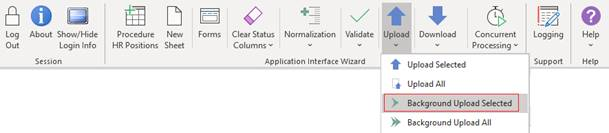
(c) Background Upload Selected records - This option is only available in a ‘Procedure’ mode. Validates and uploads selected records as per ‘Upload Selected’ option, however will cause the Wizard to create a concurrent request to upload records.
(d) Background Upload All records - This option is only available in a ‘Procedure’ mode. Validates and uploads all records as per ‘Upload All’ option, however it will cause the Wizard to create a concurrent request to upload records.
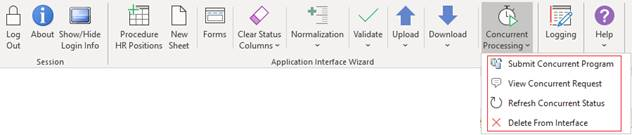
3. To view the request for the concurrent background processes, click on the ‘Concurrent Processing’ icon and select ‘View Concurrent Request’ from the product ribbon. Once the request has ‘Completed’ click ‘Refresh Interface Status’ from the ribbon and the upload messages will return to the worksheet.
Note - If this option is not available on your version of the Wizard then you will need to download the latest version and packages from our website.
Improving Upload Performance by Removing Cell Defaulting and Colouring
When uploading large volumes of data, the Wizard performance can start to diminish when Excel reaches its memory limits.
The following Wizard worksheet standard operations can affect this:
• Writing default row values (Row 10) down into the data section of the worksheet.
• Writing cell comments for messages and statuses.
• Formatting cell colouring in the data section.
This has always been slow, because each aspect of saving must go cell by cell. Another aspect is that colouring causes the file size of Excel to increase, which eventually has a performance hit on the code and stability of Excel.