Application Interface Wizard has dynamic data entry forms. Users can double-click on any cell below Row 10 and see all columns listed in the form. Administrators can add LOV's that reference their Key Flexfield (KFF) configuration.
Key flexfields must be set up using the LOV builder. The key flex fields require a SQL statement to return existing concatenated segments, as well as providing flex information such as an Application.
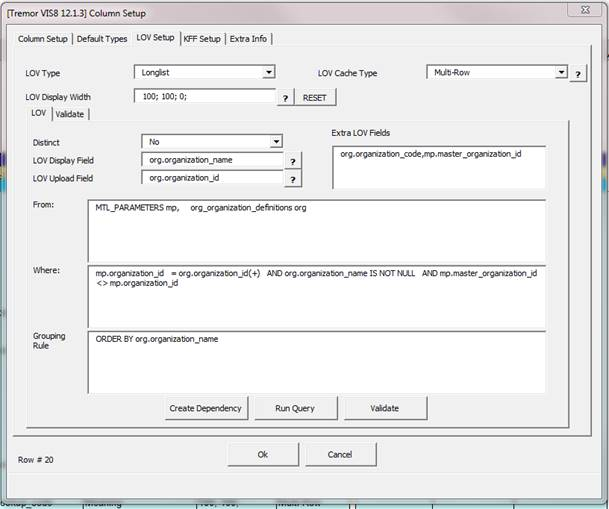
A LOV must be set up against the column to return existing combinations. The LOV Value Field should be the concatenated segments field and the LOV Code field should be the upload ID.
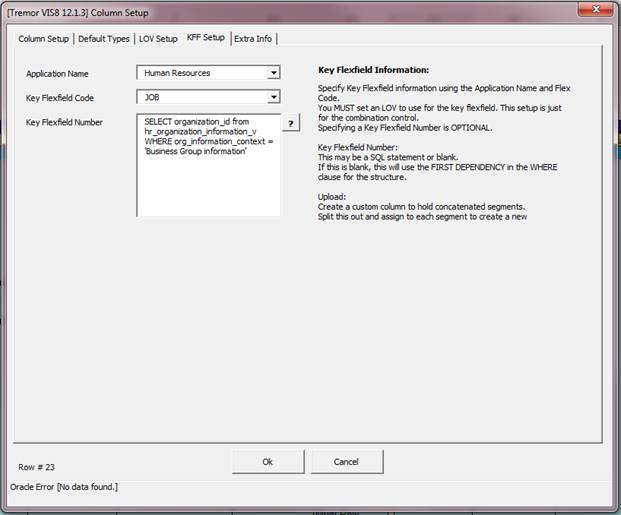
The example below shows the Job Flexfields under Human Resources. If the LOV id_flex_num (Structure ID) is dependent on another column then the dependency builder in the Setup tab must be used. In this case, the id_flex_num (structure ID) can be returned from a query that gets run during initialisation.
The initial information requirements can be sourced from EBS in the 'Application Developer' Flexfield | Key | Register screen.
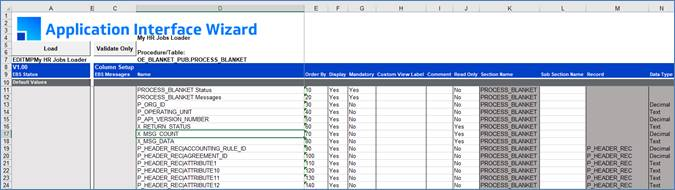
To create LOV's, click on ‘Edit By Sheet’ to download the template attributes into a spreadsheet for simpler and quicker editing.
An excel worksheet will open in the Wizard similar to the truncated image below:
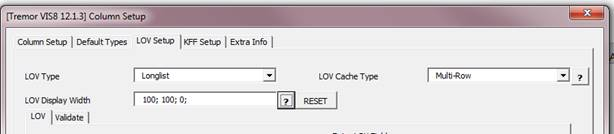
Scroll across to any of the LOV columns in this worksheet and double-click on one of these cells in the row that contains the Key Flexfield column/parameter. Display the 'LOV Setup' tab.
The LOV setup tab requires some information to get the Key Flexfield working correctly. Initially, a LOV Type of Longlist must be entered. This will allow for Key Flexfield information to be entered.
Once entered, navigate to the ‘KFF Setup’ tab.
The Application Name and Key Flexfield code must be entered.
LOV Setup
|
LOV Type
|
Key Flexfield
|
|
LOV Display Width
|
The LOV Column width is automatically determined when parsing SQL if it is blank. You can then modify the widths if the control drop-down list columns are too small or unreadable.
|
Key Flexfield
|
Field
|
Purpose
|
Example
|
|
Application Name
|
Enter the EBS 'Application' name of the KFF
|
Human Resources
|
|
Key Flexfield Code
|
Enter the 'Code' value
|
JOB
|
|
Key Flexfield Number
|
Either a SQL statement or the parent column
|
See examples below
|
|
KFF Dynamic Insertion
|
Specified Dynamic Insertion will be used for the KFF Segment Mapping
|
See examples below
|
|
KFF Segment Prefix
|
Used to specify the prefix of the KFF segments being used in the KFF fields of the template
|
See examples below
|
Tip: Take a look at the relevant structure in FND_ID_FLEXS table. Find the SET_DEFINING_COLUMN_NAME value. The sql to find the Key Flexfield Number must resolve the value for whatever this field shows. E.g. for the Accounting Flexfield this would be the CHART_OF_ACCOUNTS_ID.
Example of LOV page for Key Flexfield column:
KFF Mapping
KFF Mapping was introduced as a means of mapping the segments of a Key Flexfield in a single column value to associated database columns on upload.
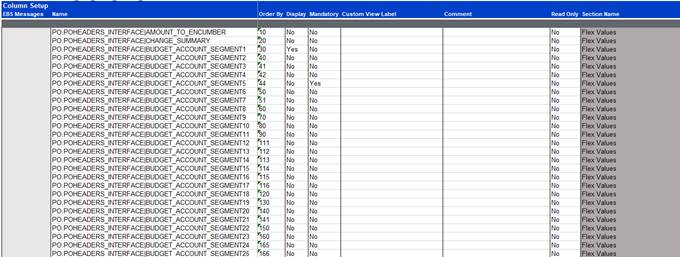
To set up KFF Mapping, the fields ‘KFF Dynamic Insertion’ and ‘KFF Segment Prefix’ need to be populated. For example, as seen below in the ‘Edit By Sheet’ there are multiple columns that are for each segment in a Key Flexfield:
Instead of needing to have every column on the sheet in order to upload multiple segments, we can use the KFF Mapping functionality to have all fields handled in one column. To do this only the SEGMENT1 field needs to be set to Display = ‘Yes’, all other segments can have Display set to ‘No’.
Next the ‘Edit By Sheet’ form can be opened and navigate to the ‘KFF Setup’ tab. From here set the ‘KFF Dynamic Insertion’ to ‘Yes’.
Next populate the ‘KFF Segment Prefix’ with the initial prefix of the segment column names excluding the segment number. For example from the above we would want this prefix to be “PO.PO_HEADERS_INTERFACE\BUDGET_ACCOUNT_SEGMENT”.
Once this has been done the ‘Edit By Sheet’ can be reloaded back against the template and the template can be applied.
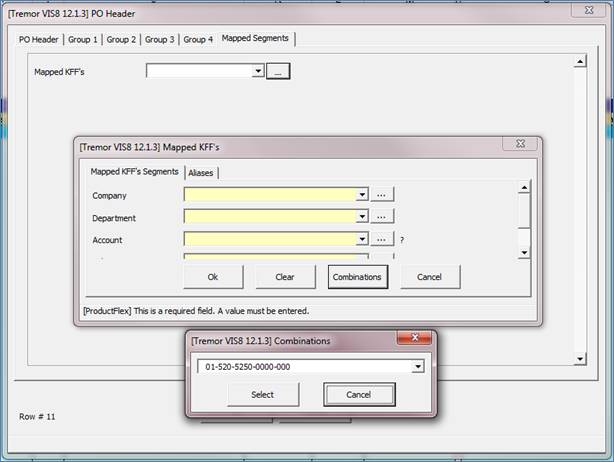
Opening the user form with a template that contains this functionality would appear as shown below:
Clicking the ellipses button will bring up the KFF form with the segments associated to the Key Flexfield.
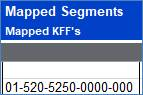
Upon upload of these values each segment will dynamically be written against the associated segment column in the database e.g.
SEGMENT1: 01
SEGMENT2: 520
SEGMENT3: 5250
SEGMENT4: 0000
SEGMENT5: 000
Refer to section: