Enter Transaction Details
Project Transaction Wizard allows defaults to be set for transactions in a batch and any data entered into row 10 will allow the other rows to automatically share that data. Once the default is set the user can either enter different data into rows below row 10 or leave blank to accept the default. Row 10 is NOT loaded into the interface table.

There are a number of columns in this Wizard that are not available in the Wizard data entry form. This is intentional. As this Wizard has been tuned to be a quick loader it has the bare minimum columns in the form. Having all columns available in the form where many are dependent on the instance, confirmation would be complex and potentially effect the performance of the Wizard.
This set of columns functions similarly to the Batch and Expenditure header zone on the Oracle Projects ‘Pre-Approved Transaction’ entry form. It sets the parameters for Transaction Source, Expenditure Type Class, Business Group, Organization and or Employee Number.
To enter transaction data either enter data directly into the columns or position your cursor on the row (below row 10) you wish to contain the Transaction data and double-click or click on the ‘Forms’ icon and select ‘Transaction Details’ on the ribbon.

a) Transaction Settings
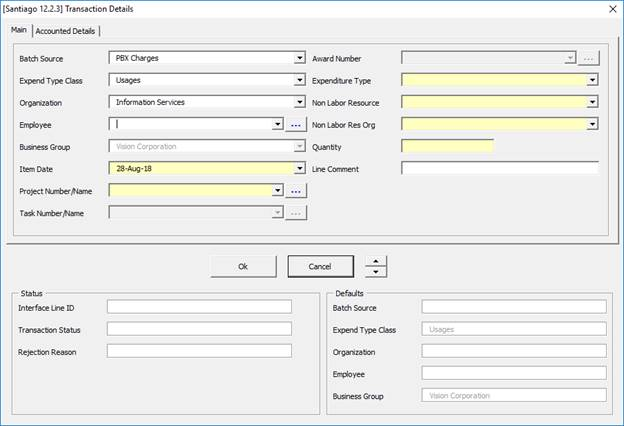
Click on the ‘Forms’ icon and select ‘Transaction Details’ and the ‘Transaction Details’ form will display:
Main tab

Enter the details relevant for your transaction. The selections available will be different depending on what ‘Expend Type Class’ is selected:
Choose a ‘Batch Source’.
‘Expend Type Class’ will populate depending on the ‘Batch Source’ chosen, but this can be overridden.
‘Item Date’ will populate to today’s date but can be changed.
Because the Batch Header settings are only optional defaults, it is possible to leave any or all of the other fields blank. The Header form will accept the valid settings without enforcing any particular item. Erroneous items will not be accepted. Upload functions and the ‘Transaction Details’ form will look for overrides first and then defaults if they exist to apply to each transaction.
There are also line-level settings for most of the Batch Header settings. Any Batch Header settings are only used as defaults and are overridden by any of these special override columns if populated.
Some buttons may not be available depending where in the process the transaction is. The buttons on this form are:
Ok – The Wizard will enter the transaction onto the spreadsheet for uploading at a later stage.
Cancel – This clears the data you have just entered into the form, and then closes the form.
Toggle Up and Down arrows – The user can toggle to the next/previous record to add/update another transaction.
Note: Unfortunately the use of the columns is not intuitive for some Transaction Source options. For example, if you wish to enter costed amounts you must use the ‘Denom Raw Cost’ column and not ‘Raw Cost’. It is an impossible task for us to provide templates for every variety of Transaction Source so we have to leave it to you to experiment. Ask More4apps if you need further assistance.
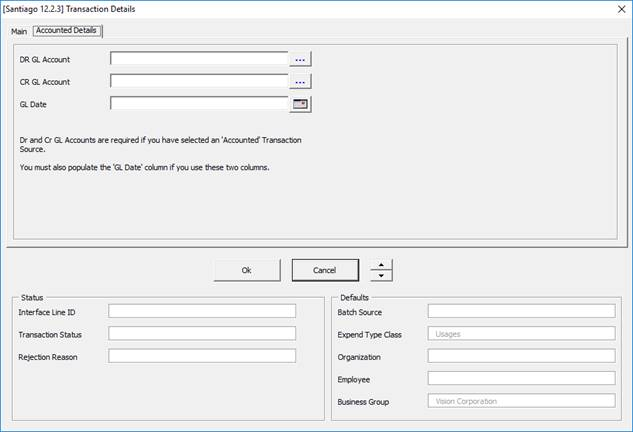
b) Accounted Details
Click on the ‘Accounted Details’ tab - the following screen will display:

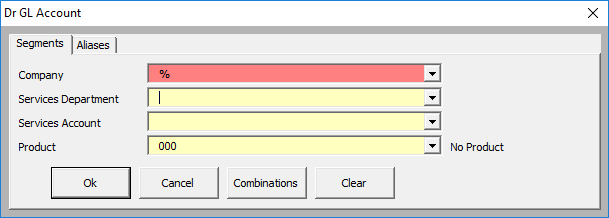
You can record ‘Accounted’ GL code combinations in this screen. You may enter the full account code combination in the form (e.g. 11-222-3333-444). You must use your correct delimiter for your chart of accounts, whether it be ‘.’ or ‘–‘ or some other character. Or you can choose an account combination or an alias through the LOVs.

You may also use the CCID value. The Wizard will detect an ID as opposed to an account combination and validate this accordingly.
Refer to section: