Now that the Wizard has been installed and configured this document will guide you through the following simple changes:
1. Create a new Worksheet (Approved Supplier List)
2. Create a new ASL using the downloaded record as a Template
3. Upload the ASL into Oracle
4. Download an ASL and associated Attributes
5. Download and make changes to an existing ASL
6. Delete (depending on security)
7. Sourcing Rule – Create, Modify and Delete
8. Assignment Set – Create, Modify and Delete
Note – The screenshots are using Oracle Release 12 and Excel 2013.
This script is designed to illustrate the downloading/creating/uploading of a customer record to give the User a “feel” for the Wizard.
The Wizard is designed to use a similar process for processing large numbers of customers/sites, which will significantly reduce data-entry time and improve productivity.
1. Create a new Worksheet
All worksheets are created from the Template123 worksheet.
Use the following steps to create your own customized template for your organization.
1.0
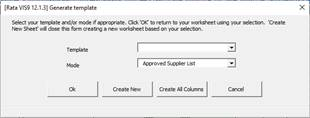
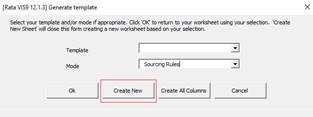
Click the ‘Select Template’ button on the Sourcing Wizard ribbon to open the ‘Generate template’ form.
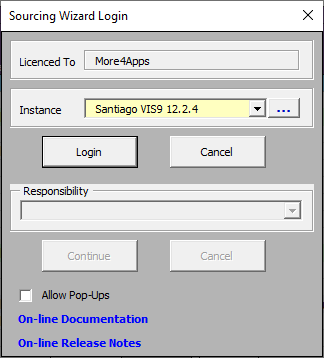
The ‘Sourcing Wizard Login’ screen will appear if you have not already logged into your Oracle Instance of Oracle.
Select the correct Oracle Instance from the drop-down list provided.
Click on the ‘Login’ button and enter your Username and Password.
This allows the user to select a template which best suits their requirements.
For the purpose of this demonstration leave the Template blank and ensure that the Mode is ‘Approved Supplier List’.
Click ‘Create New’ to create a new blank worksheet for this mode. (‘Create All Columns’ button creates a new worksheet with all columns or the ‘Ok’ button selects the chosen Mode and remains in the same worksheet).
Note – Other available Modes are ‘Sourcing Rules’ and ‘Assign Sourcing Rules’.
To make additional columns mandatory or to select additional columns etc., the common architecture templating functionality must be used. Refer to section:Manage Templates
2.Create a new Approved Supplier List
We will now use the downloaded ASL as a template for a new ASL
Step
Task
Screenshot
2.0
For this exercise, identify an item(s) to use below.
Data can be entered either directly onto the worksheet or via the Form.
2.1
In this instance we will enter via the Form.
Place your cursor on a row which holds the Supplier List.
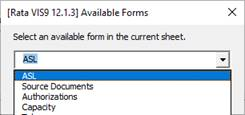
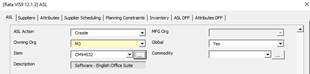
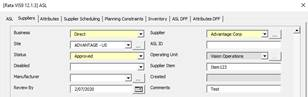
Click the ‘Forms’ icon and select ‘ASL Form’.
Alternatively double-click on a cell in the Header section.
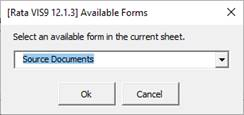
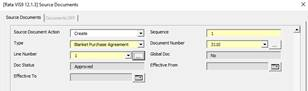
Click the ‘Forms’ icon on the ribbon and select ‘Source Documents’ from the LOVs.
2.4
Enter the following data:
Source Document Action: Create
Sequence: 1
Type: Blanket Purchase Agreement
Document Number: %... and select from LOVs
Line Number: %... and select from LOVs
Click ‘Ok’ to return to the worksheet.
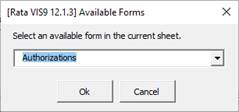
2.5
Click the ‘Forms’ icon on the ribbon and select ‘Authorizations’.
2.6
Enter the following data:
Authorization Action: Create
Authorization Sequence: 1
Authorization: Finished Goods
Authorization Cutoff Days: 10
Click ‘Ok’ to return to the worksheet.
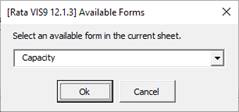
2.7
Click the ‘Forms’ icon on the ribbon and select ‘Capacity’.
2.8
Enter the following data:
Capacity Action: Create
Capacity From Date: a future date
Capacity to Date: a future date
Capacity per Day: 1
Click ‘Ok’ to return to the worksheet.
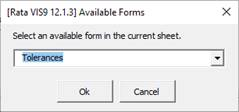
2.9
Click the ‘Forms’ icon on the ribbon and select ‘Tolerances’.
2.10
Enter the following data:
Tolerance Action: Create
Days in Advance: 1
Tolerance Percentage: 50
Click ‘Ok’ to return to the worksheet.
3.Upload the Approved Supplier List into Oracle
We will now upload this record into Oracle to create a new Approved Supplier List which will have the same Line and Attribute details except for those changed during the exercise.
Step
Task
Screenshot
3.0
Enter ‘Create’ into the ‘Default Values’ row (if they weren’t entered via the form) for the ‘Process Action’ columns in any of the following sections, if there is data to be uploaded:
ASL
Attributes Information
Source Documents
Authorizations
Capacity
Tolerances
3.1
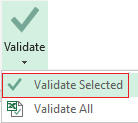
Click the ‘Validate’ icon and select ‘Validate Selected’ on the Sourcing Wizard ribbon.
The Processing form will display.
Click ‘Close’ to close the form.
3.2
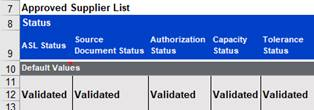
Your Approved Supplier List will show a Status of Validated.
If you encounter any errors, correct them and re-validate the record by placing your cursor on any row with the ASL and completing the validate step again.
Do this as many times as appropriate until all lines have a Validated upload result.
3.3
Click the ‘Upload’ icon and select ‘Upload All’ on the Sourcing Wizard ribbon.
3.4
Your record will show a Status of Accepted.
If you encounter any errors read the Upload Message column (in the appropriate section) and refer to theError Handling and Validationsection of this document.
3.5
Log into Oracle and check the Approved Supplier List has been loaded successfully.
4.Download an Approved Supplier List and associated Attributes
We will now download into the worksheet the Supplier List created above.
4.0
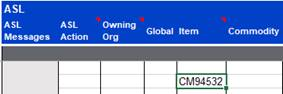
Put cursor on a blank row.
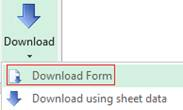
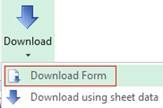
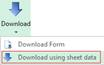
Click on the ‘Download’ icon and select ‘Download Form’ on the ribbon.
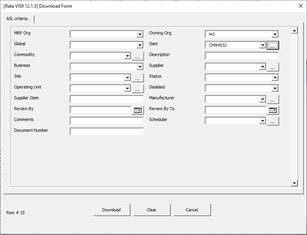
4.1
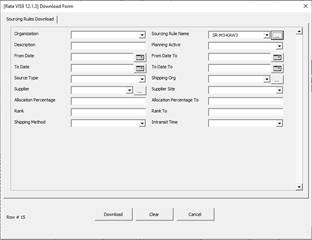
The ‘Download Form’ will appear.
Select an item you used earlier or one of the other parameters.
Click the ‘Download’ button on the form.
4.2
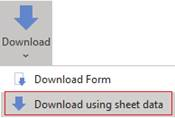
Or an alternative to using the form is to enter the ‘Owning Org’ and ‘Item’ onto the sheet, highlight a field and click the ‘Download’ icon on the ribbon and select ‘Download using sheet data’.
4.3
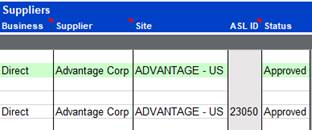
The Approved Supplier List will now have downloaded to your worksheet.
Note: The ‘ASL ID’ column has been populated.
5.Download and make changes to an existing Approved Supplier List
We will now download the Approved Supplier List created above and make some changes.
Step
Task
Screenshot
5.0
Click the ‘New Sheet’ icon on the ribbon to open a new ASL Sheet.
Enter an existing ASL onto the sheet:
Owning Org:
Item:
Highlight the row and click the Download icon and select ‘Download using sheet data’.
5.1
Update ASL section
Enter the following update directly into the worksheet or enter via the form.
ASL Action: Update
Status: change to another valueDisabled: Yes
Comments:add a comment
5.2
Upload Data (see Section 3)
5.3
Download the data to check the updates have been done.
6.Delete (Depending on security)
You will need to have the correct security – Profile Option ‘More4Apps: SCW Allow ASL Delete’must be set to ‘Yes’.
Step
Task
Screenshot
6.0
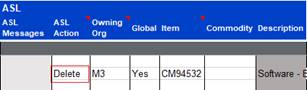
Enter an item onto the worksheet and downloading using sheet data.
6.1
Enter the ‘ASL Action’ of ‘Delete’.
6.2
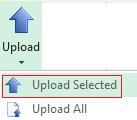
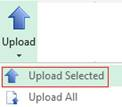
With cursor on the same row as the data, click ‘Upload’ on the ribbon and select ‘Upload Selected’.
The record will show an ‘Upload Result’ of Accepted.
6.3
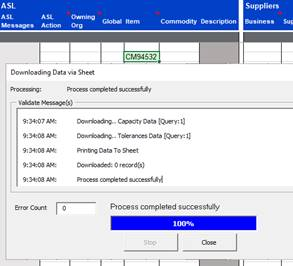
Copy ‘Item’ to a new row.
‘Download using sheet data’ to check.
No records will return.
7.Sourcing Rule – Create, Modify and Delete
We will now create a new Sourcing Rule.
7.0
Click the ‘Select template’ icon on the ribbon (this displayed as ‘Approved Supplier List’).
On the ‘Generate template’ form select ‘Mode’ of ‘Sourcing Rules’ and click ‘Create New’.
You can create new records by entering directly into the worksheet or by double-clicking on a blank row to open the form.
Double-click on a blank row in the Header section and enter the following data:
Sourcing Rule Action: Create
Organization:
New Sourcing Rule Name: Name of Sourcing Rule
Click ‘Ok’ to close the form and save the transaction.
7.1
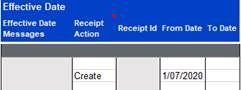
Effective Date section
Enter the following data directly onto the worksheet:
Receipt Action: Create
From Date: Today’s date
To Date: Optional
7.2
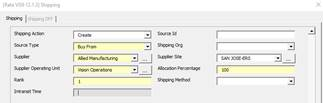
Shipping section
Click the ‘Forms’ icon and select ‘Shipping’ from the LOVs.
Enter the following data:
Shipping Action: Create
Source Type: Buy From
Supplier:
Supplier Site:
Allocation Percentage: 100
Rank: 1
Click ‘Ok’ to close the form and on the next line enter the following shipping info:
Add a second line in shipping
Shipping Action: Create
Source Type: Transfer From
Shipping Org:
Allocation Percentage: 100
Rank: 2
7.3
Place the cursor on the line to be uploaded.
Click the ‘Upload’ icon and select ‘Upload Selected’ from the ribbon.
7.4
Log into your instance of Oracle and check the Assignment Set has been loaded successfully.
Navigation: Supply Base > Sourcing Rules
Organization:
Download Sourcing Rule and make changes
We will now modify the Sourcing Rule created above.
7.5
Place the cursor on a blank row and click the ‘Download’ icon and select ‘Download Form’ from the Wizard ribbon.
7.6
The ‘Download Form’ will appear.
Enter name created in step 7.0 in the Sourcing Rule Name field.
Click the ‘Download’ button on the form.
7.7
The Sourcing Rule Name record will display in the worksheet.
7.8
Double-click on the record in each section or enter directly into the fields on the worksheet, the following data:
Shipping Action: Update
For the Shipping information section change/update the following fields:
Supplier:
Supplier Site:
Click the Upload icon and select ‘Upload Selected’ on the ribbon.
7.9
Log into your instance of Oracle and check the Assignment Set has been updated successfully.
Navigation: Supply Base > Sourcing Rules
Delete the Sourcing Rule (New Responsibility: Purge Sourcing rules)
We will now delete the Sourcing Rule created above.
7.10
Download the Sourcing Rule created above by entering the data directly onto the worksheet in the ‘Sourcing Rule Name’ field.
With cursor on the same row as the data, click the Download icon and select ‘Download using sheet data’.
Enter the following data:
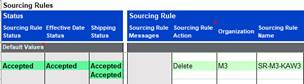
Sourcing Rule Action: Delete
Click ‘OK’ to close the form.
7.11
Click the ‘Upload’ icon and select ‘Upload Selected’ from the ribbon.
The record will show an ‘Upload Result’ of Accepted.
7.12
Log into the instance of Oracle and check the Sourcing Rule has been deleted successfully.
Navigation: Supply Base > Sourcing Rules
Search for rule.
No record can be retrieved.
8.Assignment Set – Create, Modify and Delete
We will now create an Assignment Set.
8.0
Click the ‘Generate template’ icon (presently showing ‘Sourcing Rules’ on the ribbon).
On the ‘Generate template’ form select ‘Mode’ of ‘Assign Sourcing Rules’ and click ‘Create New’.
8.1
You can create new records by entering directly into the worksheet or by double-clicking on a blank row to open the form.
8.2
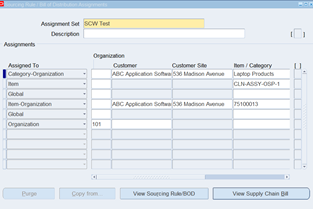
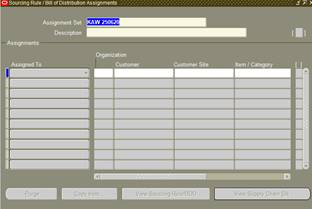
Enter ‘Assignment Set’ details.
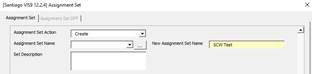
Assignment Set Action: Create
New Assignment Set Name: unique name
8.3
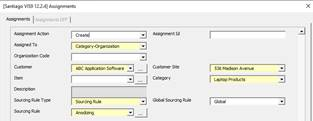
Enter ‘Assignment’ details:
Assignment Action: Create
Assigned To:
Customer:
Customer Site:
Category:
Sourcing Rule Type:
Global Sourcing Rule:
Sourcing Rule:
8.4
With cursor on the same row as the data, click the ‘Upload’ icon and select ‘Upload Selected’ on the ribbon.
8.5
Log into Oracle and check the Assignment Set has been loaded successfully.
Navigation: Supply Base > Assign Sourcing Rules
Modify Assignment Set
We will now modify an Assignment Set.
Step
Task
Screenshot
8.6
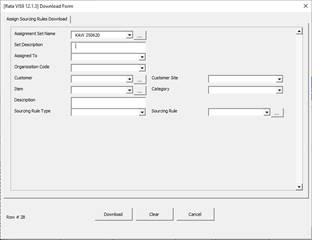
Place the cursor on a blank row, click the ‘Download’ icon and select ‘Download Form’ from the Wizard ribbon.
8.7
The ‘Download Form’ will appear.
Enter the ‘Assignment Set Name’ created above.
Click the ‘Download’ button on the form.
8.8
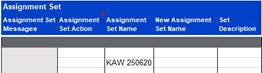
The Assignment Set Name record will display in the worksheet.
8.9
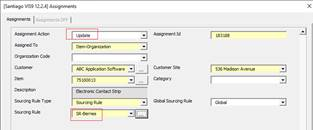
Put the cursor on the same row as the ‘Item-Organization’ record in the Assignments section and double-click to open the form.
Enter the following data:
Assignment Action: Update
Sourcing Rule: select from LOVs
Click ‘Ok’ to close the form.
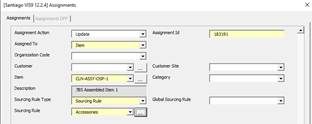
Put the cursor on the same row as the ‘Item’ record in the Assignments section (or if there isn’t a 2nd row open the form and enter data as per the screenshot) and double-click to open the form.
Enter the following data:
Assignment Action: Update (or Create if a new row)
Sourcing Rule Type: Sourcing Rule
Sourcing Rule: select from LOVs
Click ‘Ok’ to close the form.
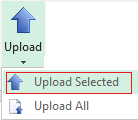
Upload the selected record by clicking the ‘Upload’ icon and selecting ‘Upload Selected’.
8.10
Log into Oracle and check the Assignment Set has been updated successfully.
Navigation: Supply Base > Assign Sourcing Rules (M3)
Search for Assignment Set.
Delete an Assignment Set
We will now delete an Assignment Set.
NOTE: Change Responsibility to ‘Purge Assignment Sets’
Step
Task
Screenshot
8.11
Download the ‘Assignment Set Name’ created above using ‘Download using sheet data’.
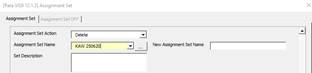
Double-click on the record line in the ‘Assignment Set’ section to open the form.
Enter the following data:
Assignment Set Action: Delete
Click ‘Ok’ to close the form.
8.12
Upload the selected record by clicking the ‘Upload’ icon and selecting ‘Upload Selected’ on the ribbon.
8.13
Log into Oracle and check the Assignment Set has been deleted successfully.