If template functionality is not being utilized, the ‘Select Template’ button on the ribbon can be used to create a More4apps default template by selecting a Mode. This will generate a default worksheet containing all relevant columns for the chosen Mode.
Any non-mandatory columns not required can be removed from the worksheet, however will be saved to the worksheet only i.e. does not change the default mode settings in the database.
Note - If profile option ‘More4Apps: RIW Restrict to templates only’ is enabled, selecting the Mode option will not be available to certain sites, responsibilities or users.
Click on the ‘Select Template’ button on the AR Invoice Wizard ribbon.
Note: Select Template is not the displayed text on the button, the button will show the default mode name that the wizard was released with, or the last mode name as selected by the user. For example; AR Invoice Wizard is released with Standard Transaction as the default mode, in the below screenshot, Credit Transaction was the last selected mode.
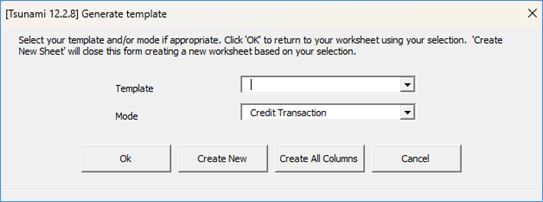
The ‘Generate template’ form will display to select the Wizard Mode.
The Wizard can have Templates assigned to individual modes.
Leave the Template field blank. Select the ‘Mode’ from the LOVs, then click ‘Create New’ if you wish to create a worksheet using the predefined default layout and columns for the selected mode.
A new worksheet will be created and named, prefixed with the selected Mode and followed by the next unique worksheet number.
Template with All Columns
Select the ‘Mode’ then click the ‘Create All Columns’ button.
A new worksheet will automatically be created that contains all available columns for the selected mode. This functionality does not require a template to be created or selected. The Wizard simply reads through the hidden record sheet for the mode and generates a new worksheet using this data.
Ok button saves the settings and closes the form.
Create New button creates a new worksheet based on your selection.
Create All Columns button creates a new worksheet with all columns.
Cancel button exits the form without changing the settings.
Refer to section: