Now that the Wizard has been installed and the configurations completed, this document will guide you through the following simple changes:
1.Create a new Worksheet
2.Download an existing Invoice
3.Change the existing Invoice
4.Upload Invoice to create a new Invoice
5.Manually create a new Invoice
Note – The Screenshots are using Oracle Release 12 and Excel 2013
This script is designed to illustrate the downloading/creating/uploading of a customer record to give the User a “feel” for the Wizard.
The Wizard is designed to use a similar process for processing large numbers of customers/sites, which will significantly reduce data-entry time and improve productivity.
1. Create a new Worksheet
Step
Task
Screenshot
1.1
Click the ‘New Sheet’ button.
1.2
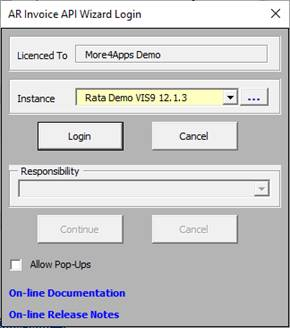
Login (if you haven’t already).
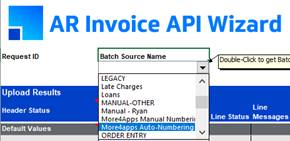
Ensure you enter a Batch Source Name in cell ‘B6’.
If this field is blank, the user can double-click and choose from the list of values.
2. Download an existing Invoice
Step
Task
Screenshot
2.1
Place your cursor on a blank row below row 10.
Click on the ‘Download’ icon and select ‘Download Form’ from the ribbon.
2.2
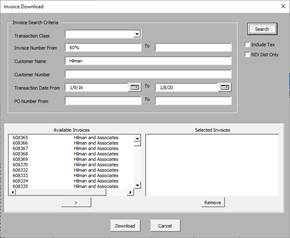
The ‘Invoice Download’ form will open.
Enter the start of an Invoice Number which exists in your instance of Oracle, and the wild card (%).
Note - The form is case sensitive so you must enter in the appropriate lower or upper case for it to return the correct invoices.
Click the ‘Search’ button.
The invoices that meet the criteria will display in the ‘Available Invoices’ section of the form.
2.3
Click an invoice from the ‘Available Invoices Section’ and select the ‘>’ to transfer the invoice to the ‘Selected Invoices’ section.
Note - You can select any number of invoices for downloading to the Wizard by:
1.Holding down the Shift key, select the individual invoices. The invoices selected and invoices between will be highlighted.
2.Holding down the Ctrl key, select any number of invoices. All invoices selected will be highlighted.
2.4
Click the ‘Download’ button on the form.
2.5
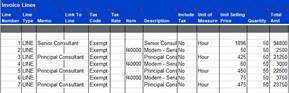
The Wizard will now display the downloaded record.
The first row will show the Invoice Header and the first line of the invoice and the subsequent rows will have the remaining lines of the invoice.
Header
Lines
3.Change the existing Invoice
Step
Task
Screenshot
3.1
Now that the existing record has downloaded into the worksheet, the details can be modified to create a new Invoice.
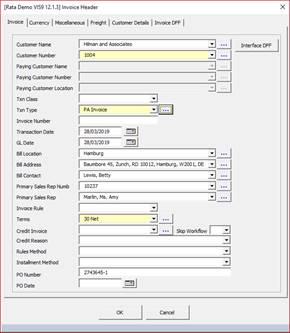
A change can be made by entering the details directly into the Wizard cell or double-clicking on one of the ‘Header’ cells or one of the ‘Line’ cells.
When double-clicking on a cell a form appears. Enter the change directly into the field or select from the list of values provided. The yellow shaded fields are compulsory.
For this demonstration change the Customer Number.
Selecting from a list of values
Where there is a list of values in your version of Oracle the options will be displayed on this form with the down arrow dropdown and button. Enter a search value in the ‘Customer Number’ field or enter the wild card (%) then click the button. Now click the dropdown , and the values able to be selected will display.
3.2
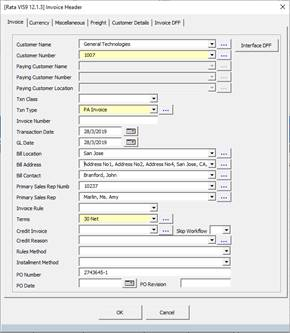
After making the change to the customer the form may display ‘red’ shaded fields. This indicates that these fields are no longer valid and require correction.
Correct the values either by entering the data directly into the Wizard or selecting from the list of values as described in step 3.1.
When the changes have been made click ‘Ok’.
The record is now ready to be uploaded into your instance of Oracle.
4. Upload to create a new Invoice
Step
Task
Screenshot
4.1
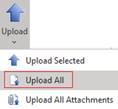
Select ‘Validate only’ from the AR Invoice API Wizard ribbon.
Click on the ‘Upload’ button and select ‘Upload All’ invoices from the ribbon.
4.2
If a record has an error the status column will display Error and the ‘Rejection Reason’ will provide guidance on the issue, as illustrated.
Read the error message in the ‘Rejection Reason’ column and correct the data as appropriate.
If you have received an error message, correct the error and repeat step 4.1.
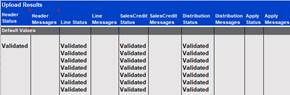
The status of the records will show as Validated if all errors have been resolved.
4.3
Change the ‘Validate only’ to ‘Validate and Upload’.
Click on the ‘Upload’ button and select ‘Upload All’ rows from the ribbon.
4.4
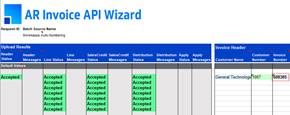
The Invoice Status will update to Accepted once the Invoice has been imported into Receivables.
Note – The Invoice Number will be populated back into the Wizard ‘Invoice Number’ column (this batch source has auto-numbering of invoice numbers).
4.5
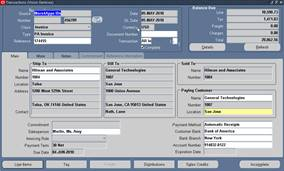
Log into Oracle Receivables and select the invoice loaded.
You will see that the invoice has been loaded with the header and line details.
5. Manually create an Invoice
5.1
The alternative to downloading an existing invoice is to create a new invoice by entering the details directly into the Wizard either as free text or using the forms.
We will not step you through this process as the data entered would be conditional on your instance of Oracle.