Now that the Wizard has been installed and configured this document will guide you through the following simple exercises:
1.Create new Template & Worksheet.
2.Create Customer Item and Customer Item XRef at the same time.
3.Create and Delete Manufacturer Part Numbers.
4.Create Item Subinventory Relationships.
5.Create and Delete Sourcing Assignment.
This script is designed to illustrate the downloading/creating/uploading of an item cost to give the User a “feel” for the Wizard.
The Wizard is designed to use a similar process for processing large numbers of item costs, which will significantly reduce data-entry time and improve productivity.
1.Create new Template & Worksheet
All worksheets are created from the Template123 worksheet.
Use the following steps to create your own customized template for your organization.
Step
Task
Screenshot
1.0
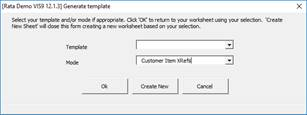
Click the ‘Select Template’ icon on the Item Extension Wizard ribbon.
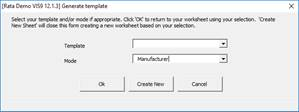
The ‘Generate template’ form will open.
Select ‘Customer Item XRefs’ from the LOVs and click ‘Create New’.
1.1
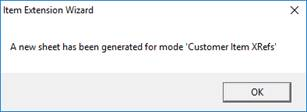
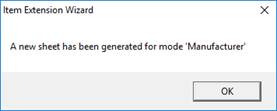
A new worksheet will be created and the message displayed will appear.
Click ‘OK’.
2. Create Customer Item and a Customer Item XRef at the same time.
2.0
Put cursor on a blank row.
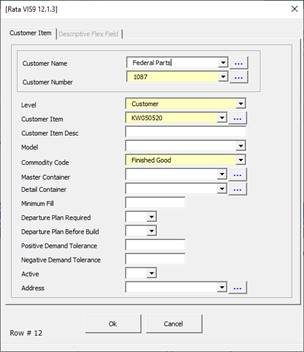
Open the data entry form by double-clicking in the ‘Customer Item’ section in any column or clicking the ‘Form’ icon on the ribbon and selecting ‘Header’ from the LOVs.
Enter Customer Item information as follows:
Customer Name: (click … button and tab to populate the Customer Number field)
Level: Customer
Customer Item: type in a unique value(click the down arrow to display existing items)
Commodity Code: Select either ‘Finished Good’ or ‘Components’.
Click ‘Ok’.
2.1
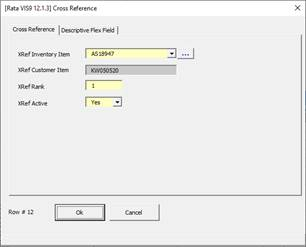
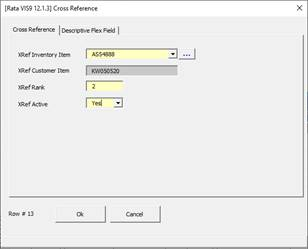
Open the Cross Reference form by double-clicking in the ‘Customer Item XRef’ section in any column or clicking the ‘Form’ icon on the ribbon and selecting ‘Lines’ from the LOVs.
Enter the following:
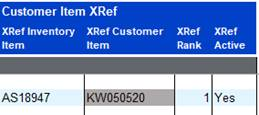
XRef Inventory Item:
XRef Customer Item: defaults from ‘Customer Item’ and Read Only column
XRef Rank: 1
XRef Active: Yes
Click ‘Ok’ to close the form.
Enter another XRef Inventory by double-clicking on the next blank row to open the form.
Enter the following:
XRef Inventory Item:
XRef Customer Item: defaults from ‘Customer Item’ and Read Only column
XRef Rank: 2
XRef Active: Yes
Click ‘Ok’ to close the form.
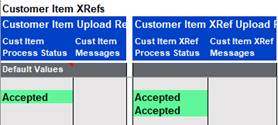
Validatedwill populate in the ‘Process Status’ fields.
2.2
Check the ‘Validate Option’ is set to ‘Validate and Upload’.
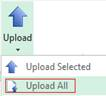
Click on the ‘Upload’ icon and select ‘Upload All’.
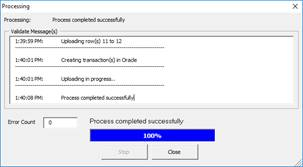
After the Processing has completed click ‘Close’.
Acceptedwill populate in the ‘Process Status’ fields.
Enter the ‘Customer Item’ created above and click the ‘Find’ button.
This will bring up the Customer Items showing their Rank.
3.Create and Delete Manufacturer Part Numbers
3.0
Click the ‘Select Template’ icon (which is now set at ‘Customer Item XRefs’) to open the Generate template form.
Select the Mode ‘Manufacturer’ and click ‘Create New’.
3.1
A new worksheet will be created and the message displayed will appear.
Click ‘OK’.
3.2
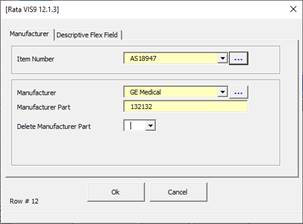
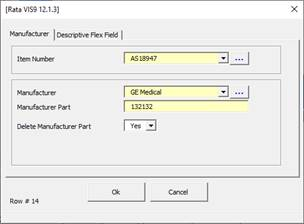
On a blank row below row 10, double-click or click the ‘Form’ icon on the header and choose ‘Header’ from the LOVs on the ribbon to open the form.
Enter the following data:
Item Number: (this is the Item Number you want to build a Manufacturer Part Number for)
Manufacturer:
Manufacturer Part: (free text)
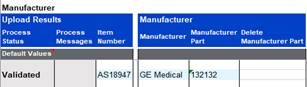
Click ‘Ok’.
Validatedwill populate in the Process Status field.
3.3
Now we are ready to upload the Manufacturer Part Number.
Make sure the ‘Validate Option’ is ‘Validate and Upload’.
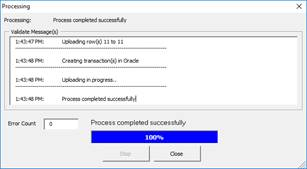
Click the ‘Upload’ icon and select ‘Upload All’.
Once the Processing is complete click the ‘Close’ button.
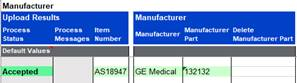
Acceptedwill populate in the Process Status field.
3.4
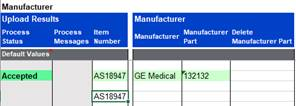
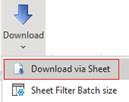
Using sheet data download the Manufacturer Part Number by either the Item Number and/or Manufacturer and/or Manufacturer Part Number.
Click the ‘Download’ button on the ribbon and select ‘Download via Sheet’.
3.5
Open the ‘Form’ and set the Delete option to ‘Yes’.
Click ‘Ok’.
3.6
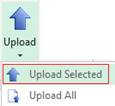
Click the ‘Upload’ icon and select ‘Upload Selected’.
This will delete the record.
4.Create Item Subinventory Relationships
4.0
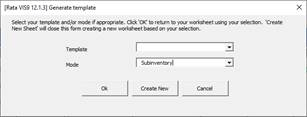
Click the ‘Select Template’ icon (which is now set at ‘Manufacturer’) to open the Generate template form.
Select the Mode ‘Subinventory’ and click ‘Create New’.
4.1
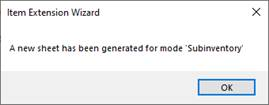
A new worksheet will be created and the message displayed will appear.
Click ‘OK’.
4.2
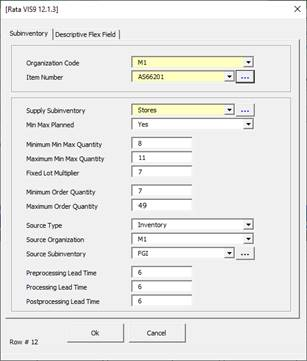
On a blank row below row 10, double-click in the Item or Subinventory section or click the ‘Form’ icon on the ribbon and select ‘Header’ from the LOVs to open the form.
Enter the following data:
Organization Code:
Item Number:
Supply Subinventory: % (and choose from LOV)
Min Max Planned: Yes
Minimum Min Max Quantity: 8
Maximum Min Max Quantity: 11
Fixed Lot Multiplier: 7
Minimum Order Quantity: 7
Maximum Order Quantity: 49
Source Type: Inventory
Source Organization:
Source Subinventory:
Preprocessing Lead Time: 6
Processing Lead Time: 6
Postprocessing Lead Time: 6
Click ‘Ok’.
4.3
Upload the data.
4.4
Download the data.
5.Create and Delete Sourcing Assignment
5.0
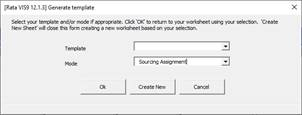
Click the ‘Select Template’ icon (which will now be displayed as ‘Subinventory) to open the Generate template form.
Select the Mode ‘Sourcing Assignment’ and click ‘Create New’.
5.1
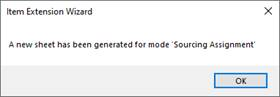
A new worksheet will be created and the message displayed will appear.
Click ‘OK’.
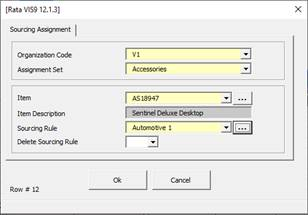
5.2
On a blank row below row 10, double-click or click the ‘Form’ icon on the ribbon and select ‘Header’ from the LOVs to open the form.
Enter the following data:
Organization Code:
Assignment Set:
Item:
Sourcing Rule:
Click ‘Ok’.
5.3
Upload the data.
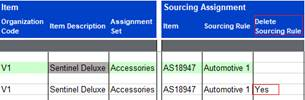
5.4
Download the data.
5.5
On the downloaded line, enter a ‘Yes’ in the ‘Delete Sourcing Rule’ field and click upload.