Demonstration Script
Now that the Wizard has been installed and configured this document will guide you through the following simple exercises:
1. Set up the Worksheet
2. Load Employees, Addresses and Assignments:
• Create a new Employee using the data-entry form
• Create a new Employee by keying into the worksheet
• Making changes to Employees from Downloaded information
3. Load Salaries as Proposed and Approved
4. Terminate an Employee
5. Rehire an Ex-Employee
Note- The screenshots are using Oracle Release 12 and Excel 2013.
|
This script is designed to illustrate the downloading/creating/uploading of a project agreement to give the user a “feel” for the Wizard.
The Wizard is designed to use a similar process for processing large numbers of agreements and funding, which will significantly reduce data-entry time and improve productivity.
|
|
1. Set up the Worksheet
| ||
|
Step
|
Task
|
Screenshot
|
|
1.0
|
There are three basic stages to loading information into Oracle HR via Employee Wizard:
(i) Set up a worksheet with relevant columns.
(ii) Put data/information into the worksheet (there are a variety of methods to do this).
(iii) Upload to Oracle and correct any errors.
|
|
|
1.1
|
Make sure the Application Mode of ‘Employee’ is selected on the Employee Wizard ribbon (as per the screenshot).
Click on the ‘Customize Fields’ button on the Employee Wizard - Setup ribbon.
Login if not already logged in.
|
 |
|
1.2
|
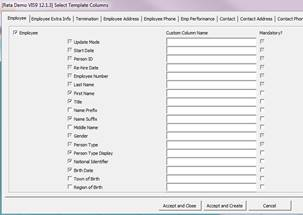
The ‘Select Template Columns’ form will open.
Each tab across the top of the form corresponds to different types of information held about an Employee in Oracle HR.
You can select a section by clicking on the check-box top-left-hand-corner of a tab. You then select fields within that section.
For this demonstration check the following sections/fields (many may already be selected):
Employee
- Re-hire Date
- First Name
- Title
- Person Type Display
- National Identifier
- Birth Date
- Office location
- Office Mailstop
- Email
- Further Person Info DFF Context
- Per Information1... Per Information14
Termination – (untick)
Employee Address (tick)
- Address Type
- Address Line1
- Address Line2
- Address Line3
- Town or City
- Region 1
- Region 2
- Postal Code
- Country
- Telephone Number 1
- Telephone Number 2
Assignment (tick)
- End Date
- Job
- Grade
- Location
- Assignment Group
- Position
- Payroll
- Status
- Assignment Category
- Salary Basis
- Review Salary Number
- Review Salary Frequency
- Supervisor Name
- Supervisor Worker Number
- Hourly Salaried
- Statutory Information KFF
- PO Set of Books
- PO Expense Account
- Assignment Details DFF Context
- Attribute 1, 2, 10, 20
Assignment Extra Info – (untick)
Untick the rest of the Tabs.
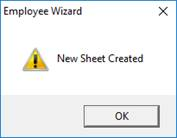
Click ‘Accept and Create’ and message box will appear ‘New Sheet Created’. Click ‘OK’.
A new worksheet has been created with the selected sections and fields.
|
  |
|
1.3
|
There is an ‘Upload Status’ column to record the overall progress of the Employee data on the corresponding line.
There is a ‘Rejection Reason’ column to record error or warning messages for data on the corresponding line.
There will be a ‘Status’ column for each section e.g. Employee Status, Employee Address and Assignment Status. This records the progress of the data within that section on the corresponding line (at a lower level than the overall Upload Status).
The remainder of the spreadsheet contains Section Titles (row 8) and fields within those sections (row 9) as selected in the template form.
|
 |
|
2. Upload Employees, Addresses and Assignments
| ||
|
2.0
|
There are various ways to populate data into the worksheet, for example:
- Keying directly into the worksheet.
- Using a data-entry form to put data into the worksheet.
- Downloading existing information from Oracle HR. (Making changes by either using the form or keying directly into the worksheet).
- Importing files or cutting/pasting from other workbooks/files.
|
|
|
Create a new Employee using the data-entry Form
| ||
|
2.1
|
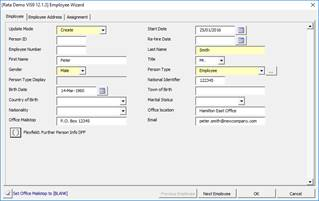
Double-click on a blank row (below row 10), or alternatively click the ‘Edit Employee’ button to open the form.
The form is created dynamically only displaying those sections and fields that are included in the current worksheet.
Enter data into the following tabs/fields:
Employee Tab
Update Mode: Create
Start Date:
Last Name: Smith
First Name: Peter
Title: Mr.
Gender: Male
Person Type: Employee
National Identifier: 122345
Birth Date: 14-Mar-1960
Office location: Hamilton East Office
Office Mailstop: P.O. Box 12345
Email: peter.smith@newcompany.com
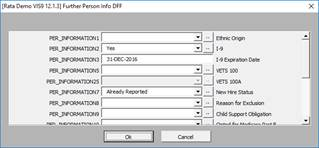
Flexfield: Further Person Info DFF (click on the DFF icon – the following info is used as an example. You can enter your own data)
- I-9: Yes
- I-9 Expiration Date: 31-DEC-2018
- New Hire Status: Already Reported
- Ethnicity Disclosed: No
(click on ‘Ok’ button)
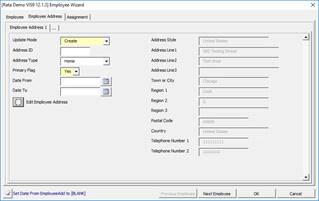
Employee Address Tab
Update Mode: Create
Address Type: Home
Primary Flag: Yes
Note – ‘Date From’ field if not entered will accept the same date as the Employee ‘Start Date’ and when Loaded the ‘Date From’ field will populate with the same date.
Edit Employee Address (click on [ ] button – the following info is used as an example. You can enter your own data)
DFF CONTEXT: United States (then tab)
ADDRESS_LINE1: 500 Testing Street
ADDRESS_LINE2: Test Area
TOWN_OR_CITY: Chicago
REGION_2: IL
POSTAL_CODE: 60606
REGION_1: Cook
COUNTRY: United States
TELEPHONE_NUMBER_1: 111111111
TELEPHONE_NUMBER_2: 222222222 (click on ‘Ok’ button)
Note: Additional addresses can be created using the ‘…’ tab.
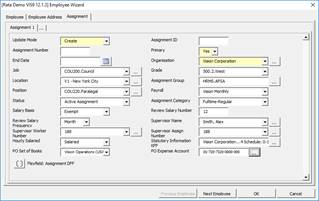
Assignment Tab
Update Mode: Create
Primary: Yes
Organisation
Job
Grade
Location
Assignment Group: (click the ‘…’ button and select ‘Segments’. Click Ok)
Position
Payroll
Status: Active Assignment
Assignment Category: Fulltime-Regular
Salary Basis: Exempt
Review Salary Number: 12
Review Salary Frequency: Month
Supervisor Name: (choose from LOVs and click on ‘…’ button and this will populate the ‘Supervisor Worker Number’ field)
Hourly Salaried: Salaried
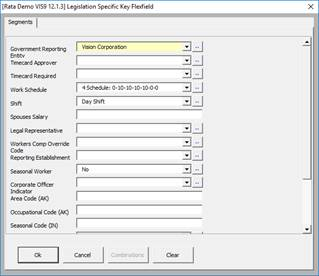
Statutory Information KFF (click on ‘…’ button – the following info is used as an example. You can enter your own data):
- Government Reporting Entity: Vision Corporation
- Work Schedule: 4 Schedule
- Shift: Day Shift
- Seasonal Worker: No
(Click ‘Ok’)
PO Set of Books
PO Expense Account: 01-720-7320-0000-000
Flexfield: Assignment DFF (click on ‘DFF’ button)
- ASS_ATTRIBUTE1: Testing
- ASS_ATTRIBUTE2: 202
NOTE: DFF will display according to the setup within your instance.
Click ‘OK’ and data will populate the worksheet.
This record is ready to be uploaded.
|
     |
|
Create a new Employee by keying into the worksheet
| ||
|
2.2
|
You could subsequently copy this Employee and key directly into the worksheet for another Employee, as follows:
Copy the record, then key new name details into the worksheet directly (i.e. Last Name, First Name, National Identifier, Email, Address Line1 EmployeeAdd).
|
 |
|
Create new Employees by copying and pasting information
| ||
|
2.3
|
You can also create new Employees by copying and pasting information from your own records. (Paste Special – Values and Number formats).
Put ‘Create’ as the Update Mode against each of the Employee, Address and Assignment records.
|
|
|
Make changes to Employees from downloaded information
| ||
|
2.4
|
A quick way to populate the worksheet for maintenance is to use the download functionality.
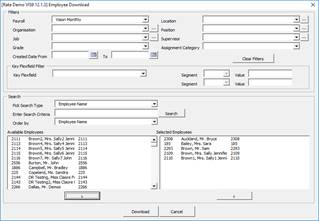
Place the cursor on a blank row, click on the ‘Download’ icon and select ‘Download via form’.
Enter:
Payroll:
Pick Search Type: Employee Name
And click on the ‘Search’ button
The records that meet the criteria will be displayed in the ‘Available Employees’ list.
Select the first 5 records in the list: use your cursor to click on the first name, hold down the shift key, and click on the last name that you need.
Use the right-arrow button ‘>’ to move the records into the ‘Selected Employees’ list.
Click on the ‘Download’ button.
|
 |
|
2.5
|
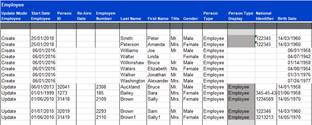
Imagine a scenario where you need to update the office details for all of these employees.
‘Effective Date’ on ribbon should be ‘Today’.
Note – For Update Mode of ‘Update’ the Wizard will use the ‘Effective Date’ on the ribbon as the date for which the change will take effect from.
Type ‘Update’ into the Update Mode Employee column of the first record downloaded.
Copy it into the other rows downloaded (only into those rows with an Employee Number populated).
Type a new ‘Office location’ (e.g Hamilton East) and ‘Office Mailstop’ (e.g. PO Box 12223) into the first record downloaded.
Copy these details into the other records (but only into those rows with an Employee Number populated).
|
 |
|
2.6
|
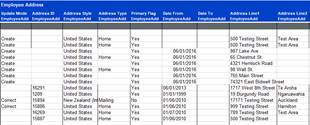
Imagine that you also want to correct a couple of addresses as they were entered incorrectly.
Go to the address section.
Type ‘Correct’ into the ‘Update Mode Address’ column in the address section for a couple of addresses that you wish to change.
Type a new Address Line1 and Address Line2 into the corresponding cells.
These records are now ready for upload.
|
 |
|
Load information into Oracle
| ||
|
2.7
|
You can set the ‘Validate Option’ to either ‘Validate only’ or ‘Validate and Upload’.
For this example select ‘Validate and Upload’.
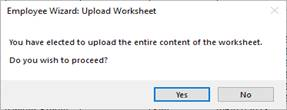
Click on the ‘Upload’ icon and select ‘Upload All’.
Click on ‘Yes’, you wish to proceed.
Then for the next message click ‘No’, you don’t want to continuing receiving error messages.
|
  |
|
2.8
|
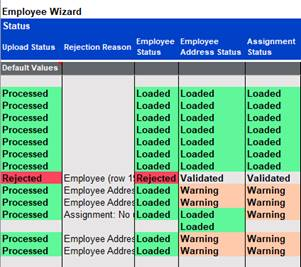
In our example one record has rejected with “The details entered for Gender and Title are inconsistent."
We will correct the Title by changing it to a valid value i.e. Mr.
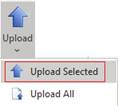
We will upload this one row by placing the cursor on the row and clicking on the ‘Upload’ button and selecting ‘Upload Selected’.
NOTE: Warning messages indicate that no update mode was selected for the particular section. These are valid as we don’t want to change the information in that section.
|
  |
|
Check example Employee in Oracle
| ||
|
2.9
|
View example in Oracle HR
Log into Oracle
>People >Enter and Maintain
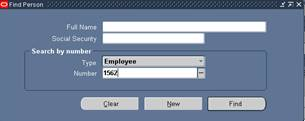
In the ‘Find Person’ form, enter the Employee Number of the first new Employee that was created.
Click on ‘Find’
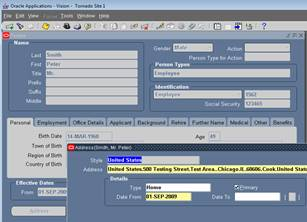
The Employee details will display and you can see the Effective Date From is the date you set it to in the worksheet.
You can click on the ‘Address’ button to see the address, and the ‘Assignment’ button to see the assignment.
|
  |
|
2.10
|
NOTE:
- Worksheets can be copied
- You can click on ‘New Worksheet’ button to create another worksheet based on the current template.
- You can create a new worksheet using the ‘Customize Fields’ button and make changes.
This demonstration changed a few simple Employees in Oracle HR in order to show the Employee Wizard functionality. Of course the Employee Wizard can be used to create or maintain very large numbers of records, be it for a new implementation or maintenance of an existing instance.
|
|
|
3. Load Salaries as Approved or Proposed
| ||
|
Step
|
Task
|
Screenshot
|
|
Set up the Worksheet for loading Salaries
| ||
|
3.0
|
Click on the ‘Customize Fields’ button to open the form.
|
|
|
3.1
|
Uncheck the section Employee Address.
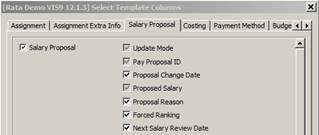
Check the ‘Salary Proposal’ section and all fields within that section except the DFF fields (Note – there are fields below the DFF fields to be ticked).
Check the ‘Assignment’ section (which includes the mandatory fields).
Click the ‘Accept and Create’ button.
The end result should be that only the ‘Agreement’ and ‘Salary Proposal’ sections are selected.
|
 |
|
Download some Employees
| ||
|
3.2
|
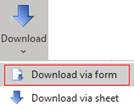
On the ribbon click on the ‘Download’ icon and select ‘Download via form’.
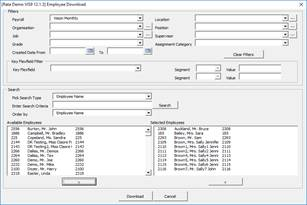
Enter data into the following fields:
Payroll
Pick Search Type – Employee Name
Click the ‘Search’ button.
Select about 10 employees using the ‘>’ button.
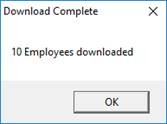
Click on the ‘Download’ button.
|
   |
|
Create new Salaries – without using prior Salary
| ||
|
3.3
|
You can create new salaries, by not using any of the information that was downloaded.
Delete all of the Salary information that was downloaded for the first two Employees.
Open the Employee Form by double-clicking in a cell for the first Employee.
|
|
|
3.4
|
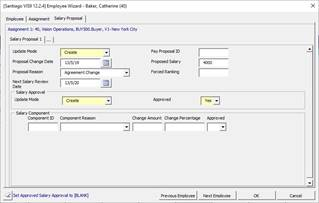
Under the ‘Salary Proposal’ tab enter:
Update Mode: Create
Proposal Change Date: pick a recent date
Proposal Reason: pick from the list
Next Salary Review Date: pick a date in about 1 year’s time
Proposed Salary: enter a value e.g. 4000
To make this salary load as approved you need to enter the following two fields:
Salary Approval Update Mode: Create
Approved: Yes
Click the ‘OK’ button to close the form.
|
 |
|
3.5
|
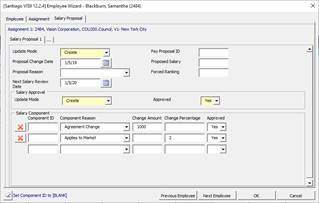
Open the form for the second Employee, this time we will enter some Component information.
(Note - Many companies do not use Components against Salary Proposals)
Under the ‘Salary Proposal’ tab enter:
Update Mode: Create
Proposal Change Date: pick a recent date
Next Salary Review Date: pick a date in about 1 year’s time
To make this salary load as approved you need to enter the following two fields:
Salary Approval Update Mode: Create
Approved: Yes
Enter Salary Component information (which will be used to calculate the new salary):
Component1
Component Reason: (Pick from LOV)
Change Amount: 1000
Approved: Yes
Component2
Component Reason: (Pick from LOV)
Change Percentage: 2
Approved: Yes
Click the ‘OK’ button to close the form.
Note – An extra row will have been inserted into the worksheet to cater for the extra component record.
|
 |
|
Create new Salaries – As a percentage of prior Salary, typed directly into Worksheet
| ||
|
3.6
|
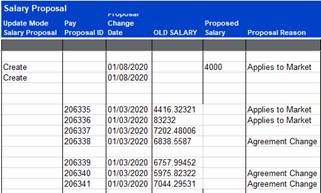
Insert a new column before ‘Proposed Salary’ and call it ‘OLD SALARY’.
Cut and Paste the current salaries (ie ‘Proposed Salary’ column) for the remaining Employees (3rd to 10th downloaded) into the ‘OLD SALARY’ column.
|
 |
|
3.7
|
Delete the values in the ‘Pay Proposal ID’ column; these will populate when the new salaries are created.
|
|
|
3.8
|
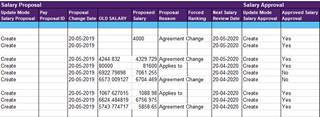
By keying directly into worksheet (and copying and pasting) check and update the remaining columns of information for these Employees:
Update Mode Salary Proposal: Create
Proposal Change Date: recent date
Proposed Salary: =BY15*1.02
Formula to increase salary by 2% where CB15 is the ‘Old Salary’ for the current employee.
Proposal Reason: Leave as is, or change a couple
Next Salary Review Date: Check it is in about 1 year’s time
Component Fields: Remove any old component information
To load the salaries as approved you need to enter in the following two fields:
Update Mode Salary Approval: Create
Approved Salary Approval: Yes
Change a couple of ‘Salary Approval – Approved Salary Approval’ values to ‘No’ so they will load as ‘Proposed Salary’.
|
 |
|
3.9
|
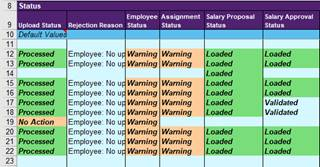
Upload all the rows on the worksheet using the ‘Upload’ icon and select ‘Upload All’.
|
 |
|
Check Salaries Example in Oracle
| ||
|
3.10
|
Navigate to the Salary Management form and look up a couple of examples.
Ø People > Salary Management
Query (F11)
Assignment Number: an Assignment #
Salary Basis: Exempt
Run Query (Ctrl-F11)
Note: You can also see the Salary with the following navigation (this would allow you to see component details for an approved salary):
Ø People > Enter and Maintain> Find > Assignment > Salary
|
|
|
3.11
|
Two Employees will have loaded as ‘Proposed Salary’ rather than ‘Approved Salary’.
You can approve these via the ‘Salary Management’ form.
OR
Download them and key the following values:
Update Mode Salary Approval: Update
Approved Salary: Yes
Then upload just these two rows and they will be approved.
Note - Leave all Employees with approved Salaries, so that next time the Demo Script is run it is going to be in the correct state.
|
|
|
4. Terminate an Employee
| ||
|
Step
|
Task
|
Screenshot
|
|
Set up the worksheet for terminating an Employee
| ||
|
4.0
|
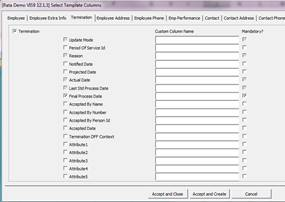
Click on the ‘Customize Fields’ button on the Employee Wizard – Setup Ribbon to open the form.
|
|
|
4.1
|
Check the ‘Termination’ section and tick the following fields:
Reason
Last Std Process Date
Final Process Date
Click the ‘Accept and Create’ button.
|
 |
|
4.2
|
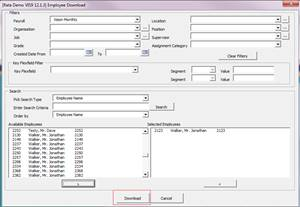
With the cursor on a blank row below row 10, click on the ‘Download’ icon and select ‘Download via form’ from the ribbon.
Enter data into the following fields:
Payroll
Pick Search Type – Employee Name
Click the ‘Search’ button.
Select an Employee using the ‘>’ button.
Click on the ‘Download’ button.
|
 |
|
4.3
|
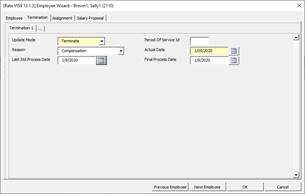
With cursor on the row of the Employee downloaded, double-click to open the form or alternatively to open the form click the ‘Edit Employee’ icon on the ribbon.
Click the ‘Termination’ tab and enter the following:
Update Mode: Terminate
Actual Date: click the calendar and select ‘Today’
Final Process Date: today’s date
Reason: select from the LOVs
Last Std Process Date: today’s date
Click ‘OK’ to close the form.
|
 |
|
4.4
|
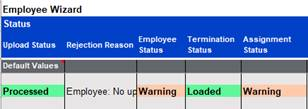
Upload the data on the worksheet using the ‘Upload’ icon and select ‘Upload All’.
Upload Status column will display Processed and ‘Termination Status’ will display Loaded.
|
  |
|
5. Rehire an Ex-Employee
| |||
|
Step
|
Task
|
Screenshot
| |
|
5.0
|
Click the ‘Select Effective Date’ button on the ribbon and select a date after today’s date.
On the Employee Wizard – Setup ribbon click ‘Download Ex Emp/Cont Workers’.
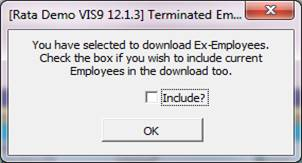
A box will display, click OK (The box ‘Include?’ should be unticked).
|
 | |
|
5.1
|
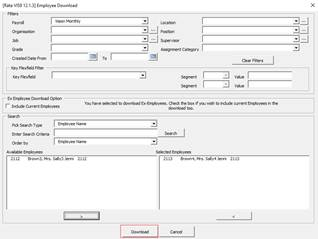
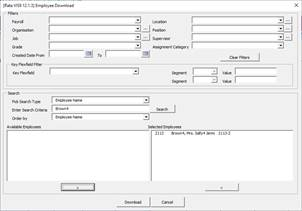
Put the cursor on a blank row in the worksheet and click ‘Download’ and select ‘Download via form’ from the Employee Wizard ribbon to open the form.
In the ‘Payroll’ field choose the same data you entered in section 4.2 above.
Click the ‘Search’ button.
Available Employees section will include the Employee you terminated in section above.
Click ‘Download’ to download this Ex-Employee.
|
 | |
|
5.2
|
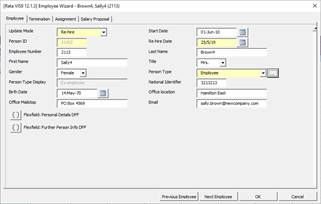
On the downloaded record, double-click to open the ‘Employee Wizard’ form.
In the Employee tab enter the following:
Update Mode: Re-hire
Re-hire Date: a date in the future
Person Type: Employee (and click the ... button)
Click ‘OK’.
|
 | |
|
5.3
|
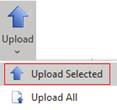
Upload the Employee using ‘Upload Selected’.
Change the ‘Effective Date’ on the ribbon to the ‘Re-hire Date’ used in 6.2 above.
Download the Employee via form:
- Make sure you deselect ‘Download Ex Emp/Cont Workers’, as the ex-employee is now an Employee again and it won’t come up as it’s only searching Ex-Employees.
- In the Download form remove any ‘Payroll’ field info, and enter the Employee Name into the ‘Enter Search Criteria’ field and click ‘Search’.
- Click ‘Download’.
Note – After download the ‘Start Date’ field is populated with the new start date and the ‘Re-hire Date’ field is empty.
|
   | |
| |||
If you encounter any problems or have any suggestions, do not hesitate to contact us at https://community.more4apps.com/s/ebs-contact-support