|
1. Create a new Worksheet
All worksheets are created from the Template123 worksheet.
Use the following steps to create your own customized template for your organization.
|
|
Step
|
Task
|
Screenshot
|
|
1.1
|
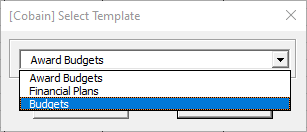
Create a new sheet by clicking the ‘New Sheet’ button on the Budget Wizard ribbon.
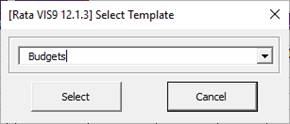
The ‘Select Template’ form will display.
Select the ‘Budgets’ option and then click the ‘Select’ button.
You will now have a new worksheet based on the ‘Budget Template’ worksheet.
|
|
|
2. Download an Existing Budget
We will now download an existing Budget into our worksheet. This enables us to see where the data, which exists in Oracle, will appear in our worksheet.
|
|
Step
|
Task
|
Screenshot
|
|
2.1
|
Place your cursor on a blank row and click the ‘Download’ icon on the Budget Wizard ribbon.
|
|
|
2.2
|
The ‘Budget Wizard Login’ screen may appear when the above action is undertaken. This indicates that you are not logged into your Oracle Instance of Oracle.
Select the correct Oracle Instance from the drop-down list provided, click on the Login button and enter your User Name and Password.
Click ‘Login’.
Select a Responsibility and click ‘Continue’.
|
|
|
2.3
|
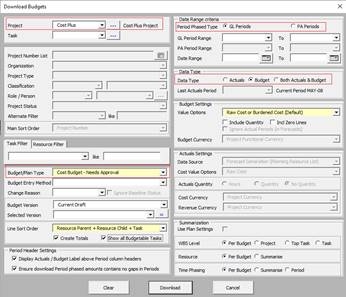
The ‘Download Budgets’ form will display.
In the ‘Project’ field, enter a Project which you know has an existing budget and is not a ‘Plan Type’ budget and does not have a ‘Budget Entry Method’ using tasks. Select the  icon. Your entry may return multiple options in the list of values. icon. Your entry may return multiple options in the list of values.
• Select the appropriate ‘Project' from the list of values.
• Select the appropriate ‘Budget/Plan Type’.
• Ensure the ‘Period Phased Type’ is appropriate based on the project selected.
• Select ‘Data Type’ of ‘Budget’.
• Click the ‘Download’ button.
If you encounter any problems, select the ‘Clear’ button and re-enter your criteria.
|
|
|
2.4
|
A message will appear detailing the number of records which have been downloaded.
Click ‘OK’.
Your worksheet will now be populated with the existing budget details.
|
|
|
2.5
|
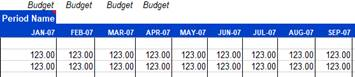
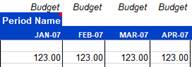
In this example there were multiple budgets associated with the project and therefore they were all downloaded. If this is the same for you, remove all budgets except for one which we will use to create a new budget.
After you have removed the unwanted Budgets you may have period dates which are not required. Delete the columns not needed.
|
Before
After Deletion
|
|
3. Create a new Budget from the downloaded record
We will now use the Budget downloaded to create a new Budget.
|
|
Step
|
Task
|
Screenshot
|
|
3.1
|
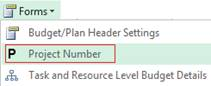
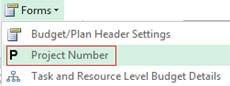
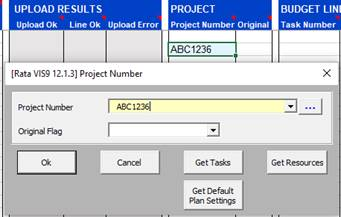
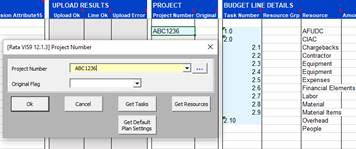
Ensure your cursor is on the first line of the Budget and click the ‘Forms’ icon and select ‘Project Number’ from the Budget Wizard ribbon.
Select an existing Project. In the Project Number field, enter some or all of the Project Number then select the  icon. Select a Project from the list of values provided. icon. Select a Project from the list of values provided.
You will note that the ‘Get Resources’ and the ‘Get Tasks’ button is abled or disabled, depending on the ‘Entry Method’ of the Budget.
Select the ‘Get Resources’ button.
For more details refer to the Project Number section in this document.
|
|
|
3.2
|
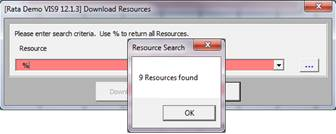
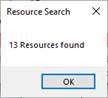
Enter a % in the Resource field and click the icon.
A message will display which details the resources available. In my example these are the same as those already on our worksheet. For the purpose of this exercise close the form without downloading any resources.
|
|
|
3.3
|
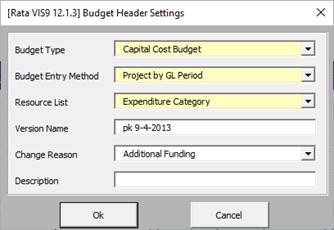
Click the ‘Forms’ icon and select ‘Budget/Plan Header Settings’ from the Budget Wizard ribbon.
Select a Budget Type which does not exist for the project selected.
Click ‘Ok’.
For more details refer to the Budget Header section in this document.
|
|
|
3.4
|
Change the period dates on your worksheet and add some extra periods with associated values for some or all resources.
|
Before
After
|
|
3.5
|
We now have a Budget which is ready to be uploaded into Oracle.
|
|
|
4. Upload the new Budget into Oracle
We will now take you through the steps to upload the Budget into Oracle.
|
|
Step
|
Task
|
Screenshot
|
|
4.1
|
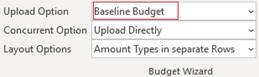
Select the ‘Edit Upload Options’ icon on the Budget Wizard ribbon.
|
|
|
4.2
|
The ‘Budget/Plan Upload Options’ form will appear. Ensure the settings are the same as those shown on the screenshot. Make sure Budgets radio button is selected when uploading a new Budget.
Click ‘Accept’.
For details on these settings and the appropriate options available to you please refer to the Budget/Plan Upload Options section of this documents.
|
|
|
4.3
|
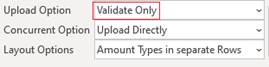
On the ribbon select ‘Validate Only’ for the ‘Upload Option’.
|
|
|
4.4
|
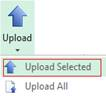
Place your cursor on the first line of the Budget and select the ‘Upload’ icon and select ‘Upload Selected’ on the Budget Wizard ribbon.
|
|
|
4.5
|
In my example an error is displayed advising that the Period Name is incorrect.
To correct this error, change the Period Names to have a value of MMM-YY in upper case.
|
|
|
4.6
|
Revalidate the Budget by placing the cursor on the first line of the Budget and select the ‘Upload’ icon and select ‘Upload Selected’ on the Budget Wizard ribbon.
|
|
|
4.7
|
Your Budget will display an ‘Upload Ok’ status of Validated and a ‘Line Ok’ status of Ok for each budget line.
At this stage the Budget has not been loaded into Oracle.
|
|
|
4.8
|
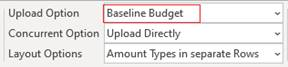
For the Upload Option select ‘Baseline Budget’ on the Budget Wizard ribbon.
|
|
|
4.9
|
Place your cursor on the first line of the Budget and select the ‘Upload’ icon and select ‘Upload Selected’ on the Budget Wizard ribbon.
|
|
|
4.10
|
Your budget will display an ‘Upload Ok’ and ‘Line Ok’ status of ‘Ok’ for each budget line.
Your budget has now been loaded into Oracle.
|
|
|
4.11
|
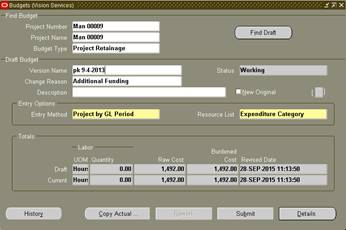
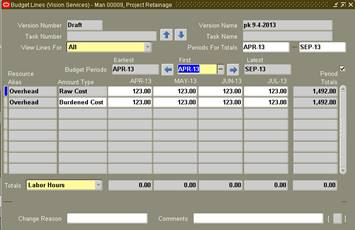
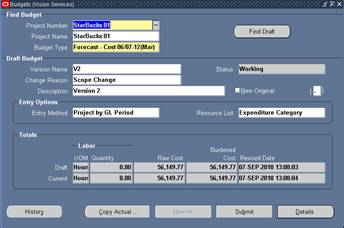
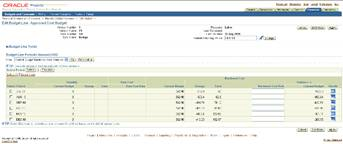
Log into Oracle and select the Budget created. The data in your spreadsheet will display in Oracle.
|
|
|
5. Make changes to an existing non-planned Budget
Now we will make some changes to the Budget created above
|
|
Step
|
Task
|
Screenshot
|
|
5.1
|
Create a new sheet by clicking the ‘New Sheet’ button on the ribbon and choose ‘Budgets’ from the LOVs.
|
|
|
5.2
|
Download the Budget created above, using the instructions at (2).
Note – In the Download form change the ‘Budget/Plan Type’ to the same as your budget.
|
|
|
5.3
|
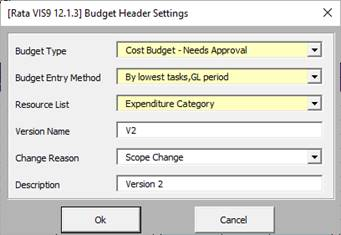
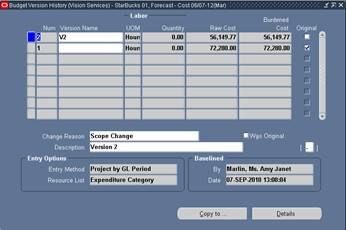
Double-click in the ‘BUDGET TYPES’ section and the ‘Budget Header Settings’ form will open.
Enter a Version Name, Change Reason, and Description into the worksheet.
Click ‘Ok’.
|
|
|
5.4
|
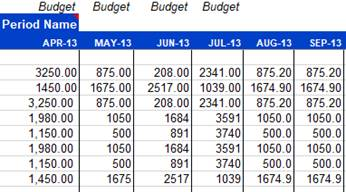
Make changes to the period values and insert additional column(s).
|
Before
After
|
|
5.5
|
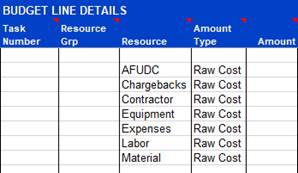
Delete a row holding one of the Resources from the worksheet.
|
Before
After
|
|
6. Load the changes into Oracle
We will now load the changes to the existing budget into Oracle
|
|
6.1
|
Select the ‘Edit Upload Options’ icon on the Budget Wizard ribbon.
|
|
|
6.2
|
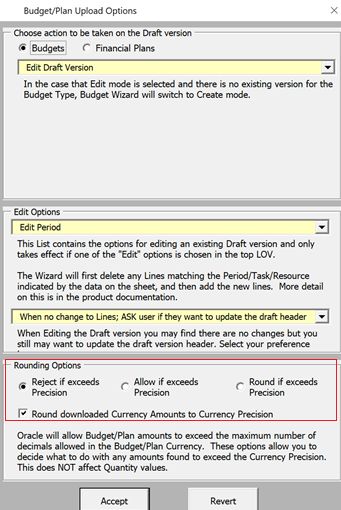
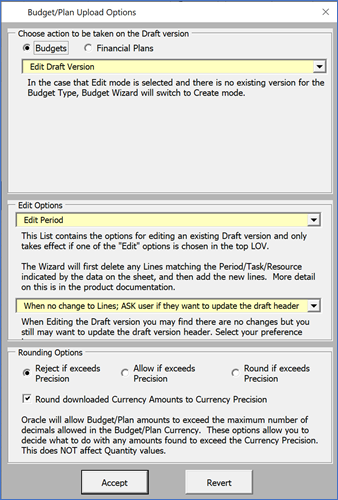
The following form will appear. Ensure the settings are the same as those shown on the screenshot.
For details on these setting and the appropriate options available to you please refer to the Budget/Plan Upload Options section of this documents.
Click ‘Accept’.
|
|
|
6.3
|
On the ribbon select ‘Upload Option’ of ‘Validate Only’.
|
|
|
6.4
|
Place your cursor on the first line of the budget and click the ‘Upload’ icon and select ‘Upload Selected’ on the Budget Wizard ribbon.
|
|
|
6.5
|
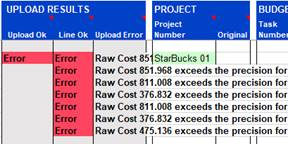
In my example I received an error in the value entered under each period as I have exceeded the precision for Currency USD.
This is held in the ‘Budget/Plan Upload options. To find this form select the Upload Options icon on the Budget Wizard ribbon.
For my example I have changed the rounding to ‘Round if exceeds Precision’. Subsequently no change is required to my worksheet.
|
|
|
6.6
|
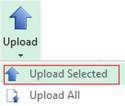
Revalidate the budget by placing your cursor on the first line of the budget and click the ‘Upload’ icon and select ‘Upload Selected’ on the Budget Wizard ribbon.
|
|
|
6.7
|
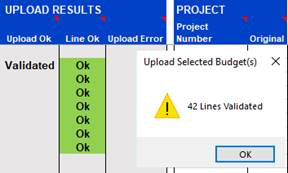
Your budget should display an ‘Upload Ok’ status of Validated and a ‘Line Ok’ status of Ok for each budget line.
At this stage the budget has not been created in Oracle.
|
|
|
6.8
|
For the ‘Upload Option’, select ‘Baseline Budget’ on the Budget Wizard ribbon.
|
|
|
6.9
|
Place your cursor on the first line of the budget and click the ‘Upload’ icon and select ‘Upload Selected’ on the Budget Wizard ribbon.
|
|
|
6.10
|
Your budget should display an ‘Upload Ok’ and a ‘Line Ok’ status of Ok for each budget line.
Your budget has now been loaded into Oracle.
|
|
|
6.11
|
Log into Oracle and select the Budget created. The data in your spreadsheet will display in Oracle.
|
|
|
7. Create a Plan Type Budget
We will now create a Plan Type Budget using the forms available in the Wizard.
|
|
Step
|
Task
|
Screenshot
|
|
7.1
|
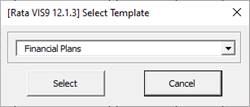
Select the ‘New Sheet’ icon on the Budget Wizard ribbon.
The select Template form will be provided. Select the ‘Financial Plans’ option and then click the ‘Select’ button.
You will now have a new worksheet based on the ‘Financial Plans’ template worksheet.
|
|
|
7.2
|
Place your cursor below row 9 and select the ‘Forms’ icon and select ‘Budget/Plan Header Settings’ on the Budget Wizard ribbon.
|
|
|
7.3
|
The ‘Plan Version Settings’ form will open.
Populate all yellow fields and ensure that you enter a WBS Level of ‘Top Task’, Time Phasing of ‘GL Period’ and a ‘Resource List’ from the list of values provided.
Click the ‘Ok’ button.
|
|
|
7.4
|
Ensure your cursor is on the same line as the Plan settings and in the Project Number column.
Click the ‘Forms’ icon and select ‘Project Number’ on the Budget Wizard ribbon.
Select an existing Project Number which has Tasks.
In the Project Number field, enter some or all of the Project Number then select the icon. Select a project from the list of values provided.
The following buttons will appear on the form:
- Get Tasks
- Get Default Plan Settings
- Get Resources
These buttons will be active depending on the Plan Header options and the type of project selected.
For more details refer to the Project Number section in this document.
|
|
|
7.5
|
Get Tasks
As we have selected the WBS level of tasks (on the Plan Header form) this button is active.
Select the ‘Get Tasks’ button.
You will notice that the worksheet is now populated with the Tasks from the project selected and that the ‘Get Tasks’ button is now inactive.
If you have selected a Project which does not have tasks, then the worksheet will show no tasks downloaded.
|
|
|
7.6
|
Get Resources
Select the ‘Get Resources’ button.
The ‘Download Planning Resources’ form will appear.
Enter a % in the Resource field and select the icon.
A message will display which details the resources available. Click ‘OK’.
NOTE: You could now click the ‘Download’ button which will populate the worksheet with the resources per the ‘Resource List’ entered on the Plan Header form. For this exercise we will NOT download the resources.
Select the ‘Cancel’ button on the ‘Download Planning Resources’ form.
|
Example where Resources are downloaded:
|
|
7.7
|
Get Default Plan Settings
For this exercise we will NOT select this button.
If you did select this button, then the planning options for the project selected will be written into the worksheet.
Select ‘Ok’ on the ‘Project Number’ form.
|
Example message if this button is selected.
|
|
7.8
|
In this example opposite, we have selected a ‘WBS Level’ of ‘Top Task’. We will therefore remove the lower level Tasks from the worksheet.
|
Before After
|
|
7.9
|
Double click on each of the Tasks and enter the ‘Resource’ and ‘Amount Type’.
|
|
|
7.10
|
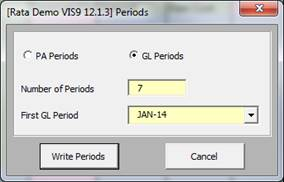
Period Name
Enter The period name in each column in the format of MMM-YY. This can be entered directly into the worksheet or you can use the ‘Period Header Columns’ icon 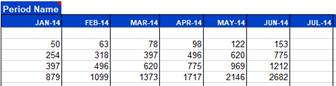 on the Budget Wizard ribbon which will provide you with the form shown. on the Budget Wizard ribbon which will provide you with the form shown.
Enter the appropriate Period, Number of Periods and First GL Period.
Select the ‘Write Periods’ button.
Enter a value for each of the tasks directly into the worksheet as there is no form provided for this data entry.
|
Before
After
|
|
7.11
|
We now have a Budget which is ready to be uploaded into Oracle.
|
|
|
8. Upload the Plan Type Budget into Oracle
We will now take you through the steps to upload the budget into Oracle.
|
|
Step
|
Task
|
Screenshot
|
|
8.1
|
Select the ‘Edit Upload Options’ icon on the Budget Wizard ribbon.
|
|
|
8.2
|
The following form will appear. Ensure the settings are the same as those shown on the screenshot.
For details on these setting and the appropriate options available to you please refer to the Budget/Plan Upload Options section of this documents.
Click ‘Accept’.
|
|
|
8.3
|
For the ‘Upload Option’ on the Budget Wizard ribbon, select ‘Validate Only’.
|
|
|
8.4
|
Place your cursor on the first line of the budget and click the ‘Upload’ icon and select ‘Upload Selected’ on the Budget Wizard ribbon.
|
|
|
8.5
|
In this example an error is displayed advising that the Period Name is incorrect.
To correct this error change the Period Name to have a value of MMM-YY in upper case.
|
|
|
8.6
|
Revalidate the budget by placing the cursor on the first line of the budget and click the ‘Upload’ icon select ‘Upload Selected’ on the Budget Wizard ribbon.
|
|
|
8.7
|
Your budget will display an ‘Upload Ok’ status of Validated and a ‘Line Ok’ status of Ok for each budget line.
At this stage the budget has not been loaded into Oracle.
|
|
|
8.8
|
For the ‘Upload Option’ select ‘Baseline Budget’ on the Budget Wizard ribbon.
|
|
|
8.9
|
Place your cursor on the first line of the budget and click the ‘Upload’ icon and select ‘Upload Selected’ on the Budget Wizard ribbon.
|
|
|
8.10
|
Your budget will display an ‘Upload Ok’ and ‘Line Ok’ status of Ok for each budget line.
Your Budget has now been loaded into Oracle.
|
|
|
8.11
|
Log into Oracle and select the Budget created. The data in your spreadsheet will display in Oracle.
|
|
|
End of Demonstration
|