Now that the Wizard has been installed and configured this document will guide you through the following simple changes:
1.Createa new Worksheet
2.Createa Receipt using the form
3.Uploadthe Receipt into Oracle
4.ApplyInvoices to a Receipt
5.Downloadexisting Receipts and Applications
6.UnapplyInvoices and upload into Oracle
Note - The screenshots are using Oracle Release 12 and Excel 2013.
This script is designed to illustrate the downloading/creating/uploading of a receipt to give the user a “feel” for the Wizard.
The Wizard is designed to use a similar process for processing large numbers of customers/sites, which will significantly reduce data-entry time and improve productivity.
1. Create a new Worksheet
The basis of the worksheets is the Template123 worksheet which has all the available columns for recording Receipt data.
However, the AR Receipt Wizard also provides a template for each of the four modes (Create, Apply, Adjustment and Unapply) using only the relevant columns for each mode from the Template123.
To create a worksheet from the original Template123 worksheet, select the ‘All Columns’ option when creating a New Sheet.
Step
Task
Screenshot
1.1
Click on ‘New Sheet’ button from the AR Receipt Wizard ribbon.
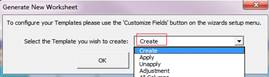
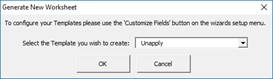
The ‘Generate New Worksheet’ form will display.
Select ‘Create’ from the LOVs, click OK and then ‘Cancel’.
2.0Create a Receipt using the Data-Entry Form
Step
Task
Screenshot
2.1
Select Validate Option of ‘Validate only’ and Upload Action of ‘Create’ on the AR Receipt Wizard ribbon.
2.2
Place your cursor on a blank field below row 10.
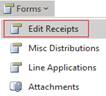
Double click on any column in the ‘Receipt’ section of the worksheet or click ‘Forms’ and select ‘Edit Receipts’ on the AR Receipt Wizard ribbon to open the Receipts form.
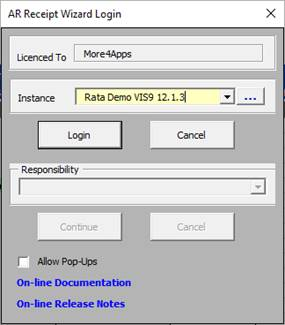
The screen displayed to the right may appear when the above action is undertaken. This indicates that you are not logged into your Oracle Instance of Oracle.
Select the correct Oracle Instance from the dropdown list provided, click on the Login button and enter your User Name and Password.
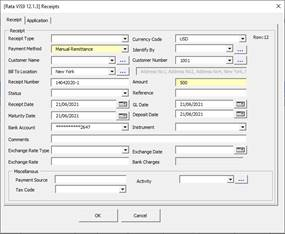
The yellow fields are compulsory and require an entry.
To access the values associated with the field enter the wild card (%) into the field and then select the search button.
When the down arrow is selected a list of values will appear.
2.4
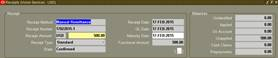
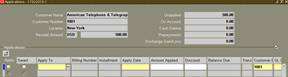
On the form enter the following:
Payment Method: Pickfrom the list of values.
Receipt Date: If this is not entered it will default to today’s date.
Customer Number: Select any who has invoices pending payment, then tab and this will populate the Customer Name field.
Amount: An amount which has been received.
Receipt Number: Enter a relevant value based on your instance of Oracle.
Deposit Date: If not entered will default to today’s date.
GL Date: If not entered will default to today’s date.
Maturity Date: If not entered will default to today’s date.
Click ‘OK’.
2.5
The data entered will now appear on your worksheet.
3.0Load the Receipt into Oracle
Step
Task
Screenshot
3.1
We will now upload the record created at Step 2 into Oracle.
Ensure the ‘Validate Option’ is ‘Validate only’.
Click the ‘Upload’ icon and select ‘Upload All’.
3.2
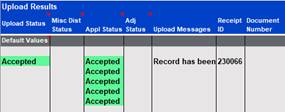
The record will now be validated by the worksheet and a status message of Validated will appear on your worksheet.
If any errors appear you should read the message supplied and make the appropriate changes on the worksheet. Revalidate the worksheet until no errors appear on your worksheet.
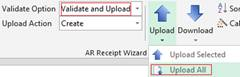
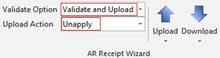
Change the ‘Validate Option’ to ‘Validate and Upload’ on the AR Receipt Wizard ribbon.
Click the ‘Upload’ icon and select ‘Upload All’ rows on ribbon.
Click ‘Close’.
3.4
The status will now appear as Accepted and the receipt will have loaded into your instance of Oracle.
3.5
Log into your instance of Oracle and select the downloaded receipt.
The receipt will appear with the details entered via the worksheet.
4. Apply Invoices to a Receipt (using the ‘Download via Sheet’ functionality)
Now that we have created the receipt we will apply Invoices to the Receipt
Step
Task
Screenshot
4.1
Change the ‘Upload Action’ option to ‘Apply’.
4.2
Place your cursor on the same line as the receipt and in the ‘Invoice Application’ section.
4.3
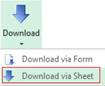
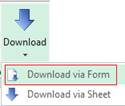
Click the ‘Download’ icon and select ‘Download via Sheet’.
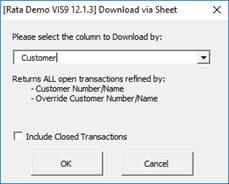
Message box will open. Select ‘Customer’ as the column to download. Click ‘Ok’.
This will download all open invoices into the Application section on your spreadsheet - in relation to the customer on that row of your spreadsheet.
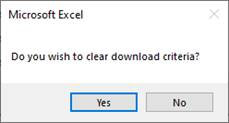
Message box will open ‘Do you wish to clear download criteria?’. Click ‘No’.
Note – If you click ‘Yes’ the receipt details will clear from the sheet.
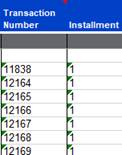
Multiple Invoices have been downloaded and a blank line entered in line with the ‘Receipt’.
If there are any other receipts on the sheet, these will have been pushed down the spreadsheet.
4.4
Select the invoice(s) that you wish to apply to the receipt and delete all others.
4.5
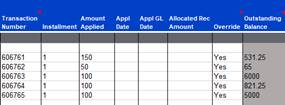
Enter the Amount Applied for each invoice you want to allocate the receipt to.
Where you are applying an amount which is less than the outstanding balance you must enter ‘Yes’ in the ‘Override’ column or the invoice application will error.
Where the value of the receipt is less than the total value of the invoices you can create a formula for the last invoice so that you only apply the remaining unallocated portion of the receipt (as illustrated in the screenshot).
4.6
On the AR Receipt Wizard ribbon:
Validate Option: Validate only
Click the ‘Upload’ icon and then select ‘Upload All’ rows on sheet.
4.7
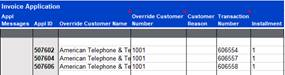
All rows will now display a Validated status against each invoice.
Note that for each invoice:
The ‘Appl Date’ has been populated with the Receipt Date and the ‘Appl GL Date’ is now populated with the Receipt GL Date.
4.8
Change the ‘Validate Option’ to ‘Validate and Upload’ on the AR Receipt Wizard ribbon.
Select the ‘Upload’ icon and then select the ‘Upload All’ rows on sheet.
4.9
All rows will now display an Accepted Status against each invoice.
4.10
Log into your instance of Oracle and select the downloaded receipt. The receipt will appear with the invoice applications entered via the worksheet.
e.g. >Receipts>Receipts
(a) Query the downloaded receipt
(b) Select the ‘APPLY’ button and you will see the invoices which have been applied.
5. Download existing Receipts and Applications
5.1
Click the ‘New Sheet’ button on the ribbon.
The ‘Generate New Worksheet’ form will display.
From the LOVs select ‘All Columns’ or ‘Unapply’ and click ‘OK’.
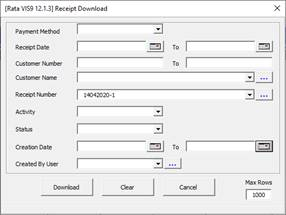
Click the ‘Download’ icon and then select ‘Download via Form’.
The ‘Download via Form’ form will open.
Select ‘Receipt’ from the LOVs.
5.2
Enter the Receipt Number created earlier.
Click ‘Download’.
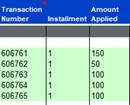
The Receipt and Applications created earlier will now be on your worksheet.
6.Unapply Invoices and upload into Oracle.
6.1
Now that the Receipt and Applied Invoices are downloaded into the worksheet, we will UNAPPLY the invoices.
You may wish to do this to reverse an Application which has been made to the wrong Receipt.
Highlight all application rows on the worksheet.
6.2
On the AR Receipt Wizard ribbon change the following:
Validate Option: Validate and Upload
Upload Action: Unapply
6.3
Click the ‘Upload’ icon and select ‘Upload Selected’.
6.4
The ‘Appl Status’ records will now show with an Accepted Status.
6.5
Log into your instance of Oracle and select the appropriate Receipt.